Vue3

Vue
- Vue (读音 /vju/,类似于 view) 是一套用于构建用户界面的渐进式 JavaScript 框架
- 全称是Vue.js 或者 Vuejs
- 它基于标准 HTML、CSS 和 JavaScript 构建,并提供了一套声明式的、组件化的编程模型
- 帮助你高效地开发用户界面,无论任务是简单还是复杂
- 什么是渐进式框架呢?
- 表示我们可以在项目中一点点来引入和使用 Vue,而不一定需要全部使用 Vue 来开发整个项目
声明式和命令式
原生开发和 Vue 开发的模式和特点,我们会发现是完全不同的,这里其实涉及到两种不同的编程范式
命令式编程和声明式编程
命令式编程关注的是how to do (怎么做)自己完成整个 how 的过程
声明式编程关注的是what to do(做什么)由框架完成 how的过程
在原生的实现过程中,我们是如何操作的呢?
- 我们每完成一个操作,都需要通过JavaScript 编写一条代码,来给浏览器一个指令
- 这样的编写代码的过程,我们称之为命令式编程
- 在早期的原生 JavaScript 和 jQuery 开发的过程中,我们都是通过这种命令式的方式在编写代码的
在 Vue 的实现过程中,我们是如何操作的呢?
我们会在 createApp 传入的对象中声明需要的内容,template、data、methods
这样的编写代码的过程,我们称之为是声明式编程
目前 Vue、React、Angular、小程序的编程模式,我们称之为声明式编程
1
2
3
4
5
6
7
8
9
10
11
12
13
14
15
16
17
18
19
20
21
22
23
24
25
26
27
28
29
30
31
32
33
34
35
36
37
38
39
40
41
42
43
44
45
46
47
48
49
50
51
52
53
54
55
56
57
<!--原生实现计时器案例-->
<html lang="zh">
<head></head>
<body>
<h2 class="counter"></h2>
<button class="add">+1</button>
<button class="sub">-1</button>
<script>
const h2El = document.querySelector("h2");
const counterEl = document.querySelector(".counter");
const addBtnEl = document.querySelector(".add");
const subBtnEl = document.querySelector(".sub");
let counter = 0;
counterEl.textContent = counter;
addBtnEl.onclick = function () {
counterEl.textContent = ++counter;
};
subBtnEl.onclick = function () {
counterEl.textContent = --counter;
};
</script>
</body>
</html>
<!--Vue实现计时器案例-->
<html lang="zh">
<head>
<script src="https://cdn.staticfile.org/vue/3.0.5/vue.global.js"></script>
</head>
<body>
<div id="app">
<h2>{{ counter }}</h2>
<button @click="increment">+1</button>
<button @click="decrement">-1</button>
</div>
<script>
Vue.createApp({
data() {
return { counter: 0 };
},
methods: {
increment() {
this.counter++;
},
decrement() {
this.counter--;
},
},
}).mount("#app");
</script>
</body>
</html>
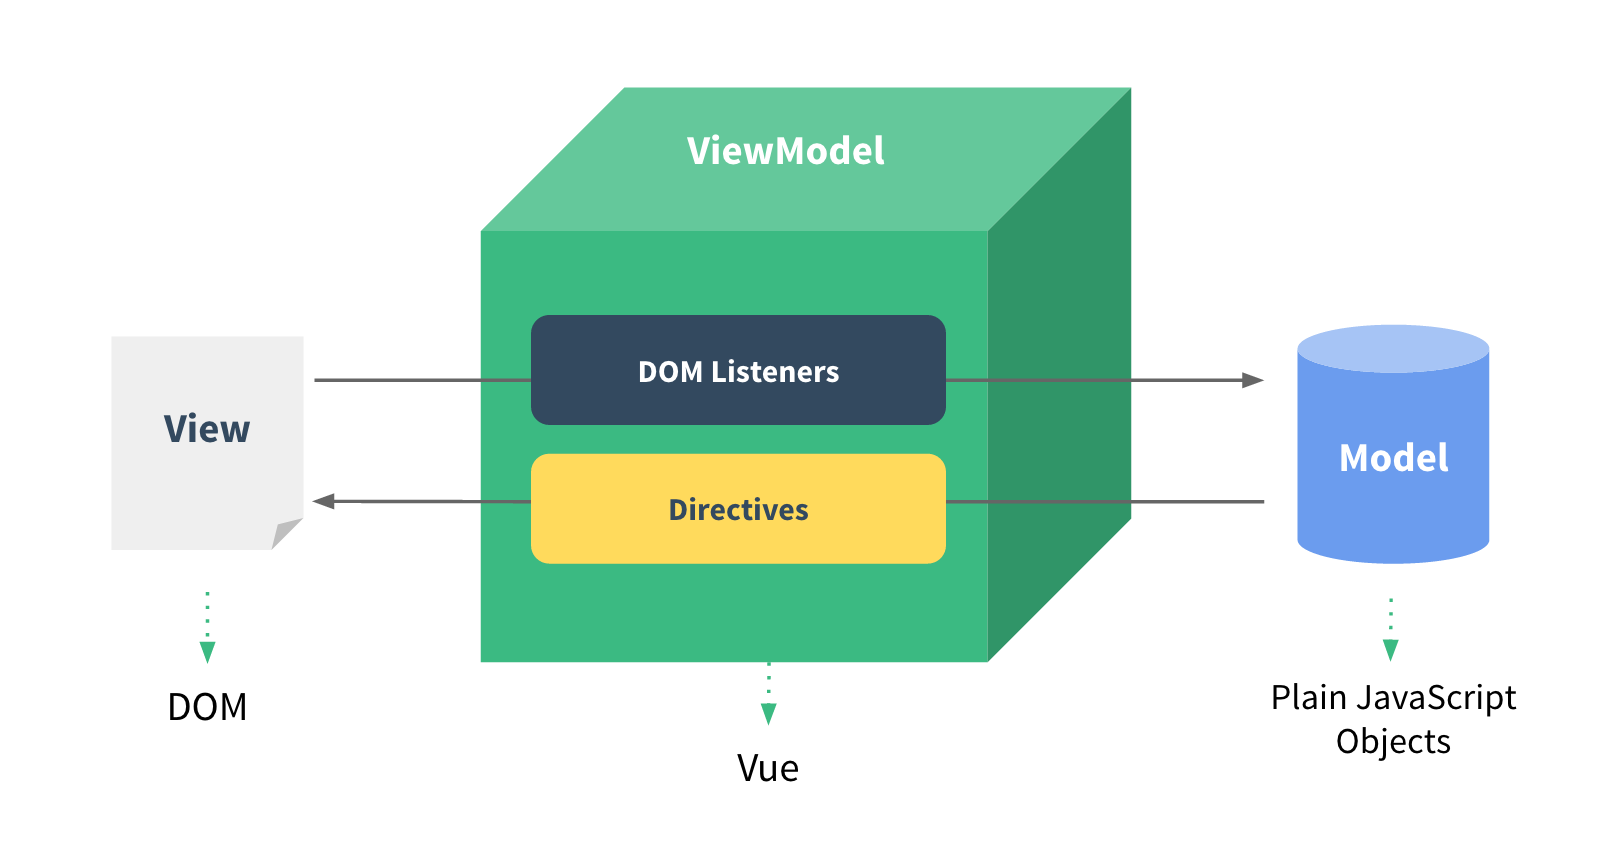
MVVM 模型
MVC 和 MVVM 都是一种软件的体系结构
- MVC 是 Model – View –Controller 的简称,是在前期被使用非常框架的架构模式,比如 iOS、前端
- MVVM 是 Model-View-ViewModel 的简称,是目前非常流行的架构模式
通常情况下,我们也经常称 Vue 是一个 MVVM 的框架
- Vue 官方其实有说明,Vue 虽然并没有完全遵守 MVVM 的模型,但是整个设计是受到它的启发的

data
- data 属性是传入一个函数,并且该函数需要返回一个对象
- 在Vue2.x的时候,也可以传入一个对象(虽然官方推荐是一个函数)
- 在Vue3.x的时候,必须传入一个函数,否则就会直接在浏览器中报错
- data 中返回的对象会被Vue 的响应式系统劫持,之后对该对象的修改或者访问都会在劫持中被处理
- 所以我们在 template 中通过 访问 counter,可以从 data 中获取到数据
- 所以我们修改 counter 的值时,template 中的 也会发生改变
methods
methods 属性是一个对象,通常我们会在这个对象中定义很多的方法
- 这些方法可以被绑定到模板中
- 在该方法中,我们可以使用 this 关键字来直接访问到 data 中返回的对象的属性
官方文档有这么一段描述
- 问题一:为什么不能使用箭头函数?(官方文档有给出解释)
- 我们在 methods 中要使用 data 返回对象中的数据
- 那么这个this 是必须有值的,并且应该可以通过this 获取到 data 返回对象中的数据
- 那么我们这个 this 能不能是window呢?
- 不可以是 window,因为 window 中我们无法获取到 data 返回对象中的数据
- 但是如果我们使用箭头函数,那么这个this 就会是 window了
- 为什么是 window 呢?
- 这里涉及到箭头函数使用this 的查找规则,它会在自己的上层作用域中来查找 this
- 最终刚好找到的是 script 作用域中的 this,所以就是 window
- 我们在 methods 中要使用 data 返回对象中的数据
- 问题二:不使用箭头函数的情况下,this 到底指向的是什么?(可以作为一道面试题)
- 事实上 Vue 的源码当中就是对 methods 中的所有函数进行了遍历,并且通过 bind 绑定了 this
1
2
3
4
5
6
7
8
9
10
11
12
13
14
15
16
// core/packages/runtime-core/src/componentOptions.ts
export function applyOptions(instance) {
// instance --> ComponentInternalInstance
const { methods } = resolveMergedOptions(instance);
const publicThis = instance.proxy; // 组件内部实例
const ctx = instance.ctx;
if (methods) {
// 如果有 methods 属性
for (const key in methods) {
// 遍历 methods
const methodHandler = methods[key]; // 取出每一个函数
ctx[key] = methodHandler.bind(publicThis);
}
}
}- 问题一:为什么不能使用箭头函数?(官方文档有给出解释)
模板语法
- React 的开发模式
- React 使用的 jsx,所以对应的代码都是编写的类似于 js 的一种语法
- 之后通过 Babel 将 jsx 编译成 React.createElement 函数调用
- Vue 也支持 jsx 的开发模式
- 但是大多数情况下,使用基于 HTML 的模板语法
- 在模板中,允许开发者以声明式的方式将DOM和底层组件实例的数据绑定在一起
- 在底层的实现中,Vue 将模板编译成虚拟 DOM 渲染函数
- 所以,对于学习 Vue 来说,学习模板语法是非常重要的
mustache
如果我们希望把数据显示到模板(template)中,使用最多的语法是Mustache 语法(双大括号)的文本插值
- 并且我们前面提到过,data 返回的对象是有添加到Vue 的响应式系统中
- 当data 中的数据发生改变时,对应的内容也会发生更新
- 当然,Mustache 中不仅仅可以是 data 中的属性,也可以是一个JavaScript 的表达式
1
2
3
4
5
6
7
8
9
10
11
12
13
14
15
16
17
18
19
20
21
22
23
24
25
26
27
28
29
30
31
32
33<script src="https://cdn.staticfile.org/vue/3.0.5/vue.global.js"></script>
<div id="app">
<!-- 基本使用 -->
<h2>{{ counter }}</h2>
<!-- 表达式 -->
<h2>{{ counter * 2 }}</h2>
<h2>{{ info.split(" ") }}</h2>
<!-- 三元运算符 -->
<h2>{{ age >= 18 ? "成年人" : "未成年人" }}</h2>
<!-- 调用一个 methods 中的函数 -->
<h2>{{ formatDate() }}</h2>
<!-- 注意: 这里不能定义语句 -->
<!-- <h2>{{ const name = "why" }}</h2> -->
</div>
<script>
Vue.createApp({
data() {
return { counter: 100, info: "my name is strive", age: 20 };
},
methods: {
formatDate() {
return "2023-10-10 10:10";
},
},
}).mount("#app");
</script>
v-once
v-once 用于指定元素或者组件只渲染一次
- 当数据发生变化时,元素或者组件以及其所有的子元素将视为静态内容并且跳过更新
- 该指令可以用于性能优化
1
2
3
4
5
6
7
8
9
10
11
12
13
14
15
16
17
18
19
20
21
22
23
24
25
26
27
28
29
30<script src="https://cdn.staticfile.org/vue/3.0.5/vue.global.js"></script>
<div id="app">
<h1 v-once>
<span>{{ message }} - </span>
<span>{{ counter }}</span>
</h1>
<h1>
<span>{{ message }} - </span>
<span>{{ counter }}</span>
</h1>
<button @click="changeMessage">changeMessage</button>
</div>
<script>
Vue.createApp({
data() {
return { message: "Hello Vue", counter: 100 };
},
methods: {
changeMessage() {
this.message = "你好,世界";
this.counter += 100;
},
},
}).mount("#app");
</script>
v-text
用于更新元素的 textContent
1
2
3
4
5
6
7
8
9
10
11
12
13
14
15<script src="https://cdn.staticfile.org/vue/3.0.5/vue.global.js"></script>
<div id="app">
<h2>aaa {{ message }} bbb</h2>
<h2 v-text="message">aaa</h2>
<!-- 模板编译错误: v-text 将覆盖元素子级 -->
</div>
<script>
Vue.createApp({
data() {
return { message: "Hello Vue" };
},
}).mount("#app");
</script>
v-html
默认情况下,如果我们展示的内容本身是 html 的,那么vue 并不会对其进行特殊的解析
- 如果我们希望这个内容被 Vue 可以解析出来,那么可以使用 v-html 来展示
1
2
3
4
5
6
7
8
9
10
11
12
13
14
15
16
17<script src="https://cdn.staticfile.org/vue/3.0.5/vue.global.js"></script>
<div id="app">
<h2>{{ content }}</h2>
<h2 v-text="content"></h2>
<h2 v-html="content"></h2>
</div>
<script>
Vue.createApp({
data() {
return {
content: `<span style="color: red; font-size: 30px;">哈哈哈</span>`,
};
},
}).mount("#app");
</script>
v-pre
v-pre 用于跳过元素和它的子元素的编译过程,显示原始的 Mustache 标签
- 跳过不需要编译的节点,加快编译的速度
1
2
3
4
5
6
7
8
9
10
11
12
13
14<script src="https://cdn.staticfile.org/vue/3.0.5/vue.global.js"></script>
<div id="app">
<h2 v-pre>{{ message }}</h2>
<h2>{{ counter }}</h2>
</div>
<script>
Vue.createApp({
data() {
return { message: "Hello Vue", counter: 100 };
},
}).mount("#app");
</script>
v-cloak
这个指令保持在元素上直到关联组件实例结束编译
- 和 CSS 规则如 [v-cloak] { display: none } 一起用时,这个指令可以隐藏未编译的 Mustache 标签直到组件实例准备完毕
1
2
3
4
5
6
7
8
9
10
11
12
13
14
15
16
17
18
19
20
21
22<script src="https://cdn.staticfile.org/vue/3.0.5/vue.global.js"></script>
<style>
[v-cloak] {
display: none;
}
</style>
<div id="app">
<h2 v-cloak>{{ message }}</h2>
<h2>{{ message }}</h2>
</div>
<script>
setTimeout(() => {
Vue.createApp({
data() {
return { message: "Hello Vue" };
},
}).mount("#app");
}, 3000);
</script>- div 不会显示,直到编译结束
v-memo
该指令需要传入一个固定长度的依赖值数组进行比较,如果数组里的每个值都与最后一次的渲染相同,那么整个子树的更新将被跳过
1
2
3
4
5
6
7
8
9
10
11
12
13
14
15
16
17
18
19
20
21
22
23
24
25
26
27
28
29<script src="https://unpkg.com/vue@next"></script>
<div id="app">
<div v-memo="[name]">
<h2>姓名: {{ name }}</h2>
<h2>年龄: {{ age }}</h2>
<h2>身高: {{ height }}</h2>
</div>
<button @click="updateName">updateName</button>
<button @click="updateAge">updateAge</button>
</div>
<script>
Vue.createApp({
data() {
return { name: "strive", age: 18, height: 1.83 };
},
methods: {
updateName() {
this.name = "哈哈哈";
},
updateAge() {
this.age = 20;
},
},
}).mount("#app");
</script>
v-bind
- 前面讲的一系列指令,主要是将值插入到模板内容中
- 但是,除了内容需要动态来决定外,某些属性我们也希望动态来绑定
- 比如动态绑定 a 元素的 href 属性
- 比如动态绑定 img 元素的 src 属性
- v-bind 的使用
- 缩写::
- 预期:any (with argument) | Object (without argument)
- 参数:attrOrProp (optional)
- 修饰符:.camel - 将 kebab-case attribute 名转换为 camelCase
- 用法:动态地绑定一个或多个 attribute,或一个组件 prop 到表达式
绑定基本属性
v-bind 用于绑定一个或多个属性值,或者向另一个组件传递 props 值
在开发中,有哪些属性需要动态进行绑定呢?
- 还是有很多的,比如图片的链接 src、网站的链接 href、动态绑定一些类、样式等等
1
2
3
4
5
6
7
8
9
10
11
12
13
14
15
16
17
18
19
20
21
22
23
24
25
26
27
28
29
30
31
32
33
34
35<script src="https://cdn.staticfile.org/vue/3.0.5/vue.global.js"></script>
<div id="app">
<div>
<button @click="switchImage">switchImage</button>
</div>
<!-- 完整的写法 -->
<img v-bind:src="showImgUrl" />
<!-- 语法糖 -->
<img :src="showImgUrl" />
<a :href="href">百度一下</a>
</div>
<script>
Vue.createApp({
data() {
return {
url1: "http://p1.music.126.net/agGc1qkogHtJQzjjyS-kAA==/109951167643767467.jpg",
url2: "http://p1.music.126.net/_Q2zGH5wNR9xmY1aY7VmUw==/109951167643791745.jpg",
showImgUrl:
"http://p1.music.126.net/agGc1qkogHtJQzjjyS-kAA==/109951167643767467.jpg",
href: "http://www.baidu.com",
};
},
methods: {
switchImage() {
this.showImgUrl =
this.showImgUrl === this.url1 ? this.url2 : this.url1;
},
},
}).mount("#app");
</script>
绑定 class 属性
在开发中,有时候我们的元素 class 也是动态的
- 当数据为某个状态时,字体显示红色
- 当数据另一个状态时,字体显示黑色
绑定 class 有两种方式
- 对象语法
1
2
3
4
5
6
7
8
9
10
11
12
13
14
15
16
17
18
19
20
21
22
23
24
25
26
27
28
29
30
31
32
33
34
35
36
37
38
39
40
41
42
43
44
45
46<script src="https://cdn.staticfile.org/vue/3.0.5/vue.global.js"></script>
<style>
.active {
color: red;
}
</style>
<div id="app">
<!-- 普通的绑定方式 -->
<h2 :class="className">Hello World</h2>
<!-- 三元运算符绑定 -->
<h2 :class=" isActive ? 'active': '' ">Hello JavaScript</h2>
<!-- 绑定对象 -->
<h2 :class="{ active: isActive }">Hello JavaScript</h2>
<!-- 绑定多个类名 -->
<h2 :class="{ active: isActive, dark: false }">Hello JavaScript</h2>
<!-- 和普通类名一起使用 -->
<h2 class="ccc" :class="{ active: isActive }">Hello JavaScript</h2>
<!-- 从 methods 中获取 -->
<h2 :class="getDynamicClass()">Hello JavaScript</h2>
<button @click="btnClick">btnClick</button>
</div>
<script>
Vue.createApp({
data() {
return { className: "aaa bbb ccc", isActive: false };
},
methods: {
btnClick() {
this.isActive = !this.isActive;
},
getDynamicClass() {
return { active: this.isActive };
},
},
}).mount("#app");
</script>- 数组语法
1
2
3
4
5
6
7
8
9
10
11
12
13
14
15
16
17
18
19
20
21
22
23
24
25
26
27
28
29
30
31
32
33
34
35
36
37<script src="https://cdn.staticfile.org/vue/3.0.5/vue.global.js"></script>
<style>
.active {
color: red;
}
</style>
<div id="app">
<h2 :class="[ 'aaa' ]">Hello Array</h2>
<h2 :class="[ className ]">Hello Array</h2>
<h2 :class="[ isActive ? 'active' : '' ]">Hello Array</h2>
<h2 :class="[ { active: isActive } ]">Hello Array</h2>
<h2 :class="[ getDynamicClass() ]">Hello Array</h2>
<button @click="btnClick">btnClick</button>
</div>
<script>
Vue.createApp({
data() {
return {
className: "aaa bbb",
isActive: false,
};
},
methods: {
btnClick() {
this.isActive = !this.isActive;
},
getDynamicClass() {
return { active: this.isActive, bright: true, dark: false };
},
},
}).mount("#app");
</script>
绑定 style 属性
我们可以利用v-bind:style来绑定一些CSS 内联样式
- 这次因为某些样式我们需要根据数据动态来决定
- 比如某段文字的颜色,大小等等
CSS property 名可以用驼峰式 (camelCase) 或短横线分隔 (kebab-case,记得用引号括起来) 来命名
绑定 style 有两种方式
- 对象语法
1
2
3
4
5
6
7
8
9
10
11
12
13
14
15
16
17
18
19
20
21
22
23
24<script src="https://cdn.staticfile.org/vue/3.0.5/vue.global.js"></script>
<div id="app">
<!-- 普通的html写法 -->
<h2 style="color: red; font-size: 30px">哈哈哈哈</h2>
<!-- 动态绑定style, 在后面跟上 对象类型 -->
<h2 :style="{ color: fontColor, fontSize: fontSize + 'px' }">哈哈哈哈</h2>
<!-- 动态的绑定属性 -->
<h2 :style="objStyle">哈哈哈哈</h2>
</div>
<script>
Vue.createApp({
data() {
return {
fontColor: "blue",
fontSize: 30,
objStyle: { fontSize: "50px", color: "green" },
};
},
}).mount("#app");
</script>- 数组语法
1
2
3
4
5
6
7
8
9
10
11
12
13
14
15<script src="https://cdn.staticfile.org/vue/3.0.5/vue.global.js"></script>
<div id="app">
<h2 :style="[objStyle, { backgroundColor: 'purple' }]">嘿嘿嘿嘿</h2>
</div>
<script>
Vue.createApp({
data() {
return {
objStyle: { fontSize: "50px", color: "green" },
};
},
}).mount("#app");
</script>
动态绑定属性
在某些情况下,我们属性的名称可能也不是固定的
- 前端我们无论绑定 src、href、class、style,属性名称都是固定的
- 如果属性名称不是固定的,我们可以使用 :[属性名]=“值” 的格式来定义
- 这种绑定的方式,我们称之为动态绑定属性
1
2
3
4
5
6
7
8
9
10
11
12
13<script src="https://cdn.staticfile.org/vue/3.0.5/vue.global.js"></script>
<div id="app">
<h2 :[name]="'哈哈哈'">Hello World</h2>
</div>
<script>
const app = Vue.createApp({
data() {
return { name: "class" };
},
}).mount("#app");
</script>
绑定一个对象
如果我们希望将一个对象的所有属性,绑定到元素上,应该怎么做呢?
- 非常简单,我们可以直接使用 v-bind 绑定一个 对象
1
2
3
4
5
6
7
8
9
10
11
12
13
14
15
16
17
18
19
20
21<script src="https://cdn.staticfile.org/vue/3.0.5/vue.global.js"></script>
<div id="app">
<h2 :name="name" :age="age" :height="height">Hello World</h2>
<!-- 绑定对象: 给组件传递参数 -->
<h2 v-bind="infos">Hello Bind</h2>
</div>
<script>
Vue.createApp({
data() {
return {
name: "strive",
age: 18,
height: 1.83,
infos: { name: "strive", age: 18, height: 1.83, address: "北京市" },
};
},
}).mount("#app");
</script>
v-on
前面我们绑定了元素的内容和属性,在前端开发中另外一个非常重要的特性就是交互
在前端开发中,我们需要经常和用户进行各种各样的交互
- 这个时候,我们就必须监听用户发生的事件,比如点击、拖拽、键盘事件等等
- 在 Vue 中如何监听事件呢?使用v-on 指令
v-on 的使用
- 缩写:@
- 预期:Function | Inline Statement | Object
- 参数:event
- 修饰符:
- .stop - 调用 event.stopPropagation()
- .prevent - 调用 event.preventDefault()
- .capture - 添加事件侦听器时使用 capture 模式
- .self - 只当事件是从侦听器绑定的元素本身触发时才触发回调
- .{keyAlias} - 仅当事件是从特定键触发时才触发回调
- .once - 只触发一次回调
- .left - 只当点击鼠标左键时触发
- .right - 只当点击鼠标右键时触发
- .middle - 只当点击鼠标中键时触发
- .passive - { passive: true } 模式添加侦听器
- 用法:绑定事件监听
基本使用
v-on 的多种使用方式
1
2
3
4
5
6
7
8
9
10
11
12
13
14
15
16
17
18
19
20
21
22
23
24
25
26
27
28
29
30
31
32
33
34
35
36
37
38
39
40
41
42
43
44
45
46
47
48<script src="https://cdn.staticfile.org/vue/3.0.5/vue.global.js"></script>
<style>
.box {
width: 100px;
height: 100px;
margin-top: 10px;
background-color: orange;
}
</style>
<div id="app">
<!-- 完整的写法 -->
<div class="box" v-on:click="divClick"></div>
<!-- 语法糖写法 -->
<div class="box" @click="divClick"></div>
<!-- 绑定的方法位置, 也可以写成一个表达式 -->
<h2>{{ counter }}</h2>
<button @click="increment">+1</button>
<button @click="counter++">+1</button>
<!-- 元素绑定多个事件 -->
<div class="box" @click="divClick" @mousemove="divMousemove"></div>
<div class="box" v-on="{ click: divClick, mousemove: divMousemove }"></div>
<!-- <div class="box" @="{ click: divClick, mousemove: divMousemove }"></div> -->
</div>
<script>
Vue.createApp({
data() {
return { counter: 0 };
},
methods: {
divClick() {
console.log("divClick");
},
increment() {
this.counter++;
},
divMousemove() {
console.log("divMousemove");
},
},
}).mount("#app");
</script>
参数传递
当通过 methods 中定义方法,以 @click 调用时,需要注意参数问题
情况一:如果该方法不需要额外参数,那么方法后的 () 可以不添加
- 但是注意:如果方法本身中有一个参数,那么会默认将原生事件 event 参数传递进去
情况二:如果需要同时传入某个参数,同时需要 event 时,可以通过$event 传入事件
1
2
3
4
5
6
7
8
9
10
11
12
13
14
15
16
17
18
19
20
21
22
23
24
25
26
27
28
29
30
31<script src="https://cdn.staticfile.org/vue/3.0.5/vue.global.js"></script>
<div id="app">
<!-- 默认参数 -->
<button @click="btn1">按钮1</button>
<!-- 明确参数 -->
<button @click="btn2('strive', age)">按钮2</button>
<!-- 明确参数 + 默认参数 -->
<button @click="btn3('张三峰', age, $event)">按钮3</button>
</div>
<script>
Vue.createApp({
data() {
return { message: "Hello Vue", age: 18 };
},
methods: {
btn1(event) {
console.log("btn1:", event);
},
btn2(name, age) {
console.log("btn2:", name, age);
},
btn3(name, age, event) {
console.log("btn3:", name, age, event);
},
},
}).mount("#app");
</script>
修饰符
v-on 支持修饰符,修饰符相当于对事件进行了一些特殊的处理
- .stop - 调用 event.stopPropagation()
- .prevent - 调用 event.preventDefault()
- .capture - 添加事件侦听器时使用 capture 模式
- .self - 只当事件是从侦听器绑定的元素本身触发时才触发回调
- .{keyAlias} - 仅当事件是从特定键触发时才触发回调
- .once - 只触发一次回调
- .left - 只当点击鼠标左键时触发
- .right - 只当点击鼠标右键时触发
- .middle - 只当点击鼠标中键时触发
- .passive - { passive: true } 模式添加侦听器
1
2
3
4
5
6
7
8
9
10
11
12
13
14
15
16
17
18
19
20
21
22
23
24
25
26
27
28
29
30
31<script src="https://cdn.staticfile.org/vue/3.0.5/vue.global.js"></script>
<style>
.box {
width: 100px;
height: 100px;
background-color: orange;
}
</style>
<div id="app">
<div class="box" @click="divClick">
<button @click.stop="btnClick">按钮</button>
</div>
</div>
<script>
Vue.createApp({
data() {
return { message: "Hello Vue" };
},
methods: {
btnClick() {
console.log("btnClick");
},
divClick() {
console.log("divClick");
},
},
}).mount("#app");
</script>
v-if、v-else、v-else-if
v-if、v-else、v-else-if 用于根据条件来渲染某一块的内容
- 这些内容只有在条件为 true 时,才会被渲染出来
- 这三个指令与 JavaScript 的条件语句 if、else、else if 类似
v-if 的渲染原理
- v-if 是惰性的
- 当条件为 false 时,其判断的内容完全不会被渲染或者会被销毁掉
- 当条件为 true 时,才会真正渲染条件块中的内容
1
2
3
4
5
6
7
8
9
10
11
12
13
14
15
16<script src="https://cdn.staticfile.org/vue/3.0.5/vue.global.js"></script>
<div id="app">
<h1 v-if="score > 90">优秀</h1>
<h2 v-else-if="score > 80">良好</h2>
<h3 v-else-if="score >= 60">及格</h3>
<h4 v-else>不及格</h4>
</div>
<script>
Vue.createApp({
data() {
return { score: 100 };
},
}).mount("#app");
</script>
template
因为 v-if 是一个指令,所以必须将其添加到一个元素上
- 但是如果我们希望包裹的是多个元素呢?
- 此时我们渲染 div,但是我们并不希望 div 这种元素被渲染
- 这个时候,我们可以选择使用 template
template 元素可以当做不可见的包裹元素,并且在 v-if 上使用,但是最终 template 不会被渲染出来
1
2
3
4
5
6
7
8
9
10
11
12
13
14
15
16
17
18
19
20
21
22
23
24
25
26
27<script src="https://cdn.staticfile.org/vue/3.0.5/vue.global.js"></script>
<div id="app">
<template v-if="Object.keys(info).length">
<h2>个人信息</h2>
<ul>
<li>姓名: {{ info.name }}</li>
<li>年龄: {{ info.age }}</li>
</ul>
</template>
<template v-else>
<h2>没有输入个人信息</h2>
<p>请输入个人信息后, 再进行展示~</p>
</template>
</div>
<script>
Vue.createApp({
data() {
return {
info: { name: "strive", age: 18 },
// info: {},
};
},
}).mount("#app");
</script>
v-show
v-show 和 v-if 的用法看起来是一致的,也是根据一个条件决定是否显示元素或者组件
1
2
3
4
5
6
7
8
9
10
11
12
13
14
15
16
17
18
19
20
21
22
23
24
25
26
27
28
29
30
31
32
33
34
35
36
37
38<script src="https://cdn.staticfile.org/vue/3.0.5/vue.global.js"></script>
<style>
img {
width: 200px;
height: 200px;
}
</style>
<div id="app">
<div>
<button @click="toggle">toggle</button>
</div>
<img
v-show="isShowCode"
src="https://img-qn.51miz.com/Element/00/76/98/04/d5c127f8_E769804_bf765a30.png"
/>
<img
v-if="isShowCode"
src="https://img-qn.51miz.com/Element/00/76/98/04/d5c127f8_E769804_bf765a30.png"
/>
</div>
<script>
Vue.createApp({
data() {
return { isShowCode: true };
},
methods: {
toggle() {
this.isShowCode = !this.isShowCode;
},
},
}).mount("#app");
</script>
v-show 和 v-if 的区别
- 首先,在用法上的区别
- v-show 是不支持 template
- v-show 不可以和 v-else 一起使用
- 其次,本质的区别
- v-show 元素无论是否需要显示到浏览器上,它的 DOM 实际都是有存在的,只是通过 CSS 的 display 属性来进行切换
- v-if 当条件为 false 时,其对应的元素压根不会被渲染到 DOM 中
- 开发中如何进行选择呢?
- 如果我们的元素需要在显示和隐藏之间频繁的切换,那么使用 v-show
- 如果不会频繁的发生切换,那么使用 v-if
v-for
v-for 的基本格式是 “item in 数组”
- 数组通常是来自data 或者 prop,也可以是其他方式
- item 是我们给每项元素起的一个别名,这个别名可以自定来定义
我们知道,在遍历一个数组的时候会经常需要拿到数组的索引
- 如果我们需要索引,可以使用格式 “(item, index) in 数组”
- 注意上面的顺序:数组元素项 item 是在前面的,索引项 index 是在后面的
1
2
3
4
5
6
7
8
9
10
11
12
13
14
15
16
17
18
19
20
21<script src="https://cdn.staticfile.org/vue/3.0.5/vue.global.js"></script>
<div id="app">
<h2>电影列表</h2>
<ul>
<li v-for="item in movies">{{ item }}</li>
</ul>
<ul>
<li v-for="(item, index) in movies">{{ index + 1 }} - {{ item }}</li>
</ul>
</div>
<script>
Vue.createApp({
data() {
return { movies: ["星际穿越", "少年派", "大话西游", "哆啦A梦"] };
},
}).mount("#app");
</script>
支持的类型
v-for 也支持遍历对象,并且支持有一二三个参数
- 一个参数:“value in object”
- 二个参数:“(value, key) in object”
- 三个参数:“(value, key, index) in object”
v-for 同时也支持数字的遍历
- 每一个 item 都是一个数字
v-for 也可以遍历其他可迭代对象(Iterable)
1
2
3
4
5
6
7
8
9
10
11
12
13
14
15
16
17
18
19
20
21
22
23
24
25
26
27
28
29
30
31<script src="https://cdn.staticfile.org/vue/3.0.5/vue.global.js"></script>
<div id="app">
<!-- 遍历对象 -->
<ul>
<li v-for="(value, key, index) in info">
{{ value }} - {{ key }} - {{ index }}
</li>
</ul>
<!--遍历字符串(iterable) -->
<ul>
<li v-for="item in message">{{ item }}</li>
</ul>
<!-- 遍历数字 -->
<ul>
<li v-for="item in 10">{{ item }}</li>
</ul>
</div>
<script>
Vue.createApp({
data() {
return {
message: "Hello Vue",
info: { name: "strive", age: 18, height: 1.83 },
};
},
}).mount("#app");
</script>
数组更新检测
Vue 将被侦听的数组的变更方法进行了包裹,所以它们也将会触发视图更新
这些被包裹过的方法包括
- push()
- pop()
- shift()
- unshift()
- splice()
- sort()
- reverse()
替换数组的方法
- 上面的方法会直接修改原来的数组
- 但是某些方法不会替换原来的数组,而是会生成新的数组,比如 filter()、concat() 和 slice()
1
2
3
4
5
6
7
8
9
10
11
12
13
14
15
16
17
18
19
20
21
22
23
24
25
26
27
28
29
30
31
32
33
34<script src="https://cdn.staticfile.org/vue/3.0.5/vue.global.js"></script>
<div id="app">
<ul>
<li v-for="item in names">{{ item }}</li>
</ul>
<button @click="changeArray">changeArray</button>
</div>
<script>
Vue.createApp({
data() {
return { names: ["abc", "cba", "nba", "aaa", "bbb", "ccc"] };
},
methods: {
changeArray() {
// 1.直接将数组修改为一个新的数组
// this.names = ["ddd", "eee"]
// 2.通过一些数组的方法, 修改数组中的元素
// this.names.push("strive")
// this.names.pop()
// this.names.splice(2, 1, "strive")
// this.names.sort()
// this.names.reverse()
// 3.不修改原数组的方法是不能侦听(watch)
const newNames = this.names.map((item) => item + " - strive");
this.names = newNames;
},
},
}).mount("#app");
</script>
key 是什么作用?
- 在使用 v-for 进行列表渲染时,我们通常会给元素或者组件绑定一个key 属性
- 这个 key 属性有什么作用呢?我们先来看一下官方的解释
- key 属性主要用在 Vue 的虚拟 DOM 算法,在新旧 nodes对比时辨识VNodes
- 如果不使用 key,Vue 会使用一种最大限度减少动态元素并且尽可能的尝试就地修改/复用相同类型元素的算法
- 而使用 key时,它会基于 key 的变化重新排列元素顺序,并且会移除/销毁 key不存在的元素
认识 VNode
我们先来解释一下 VNode 的概念
- VNode 的全称是Virtual Node,也就是虚拟节点
- 事实上,无论是组件还是元素,它们最终在 Vue 中表示出来的都是一个个 VNode
- VNode 的本质是一个 JavaScript 的对象
1
2
3
4
5
6
7
8
9
10
11
12
13
14
15
16
17<div class="title" style="font-size: 30px; color: red;">哈哈哈</div>
<!--
const vnode = {
type: "div",
props: {
class: "title",
style: {
"font-size": "30px",
color: "red",
},
},
chidren: "哈哈哈",
};
template -> VNode -> 真实DOM
-->
虚拟 DOM
如果我们不只是一个简单的 div,而是有一大堆的元素,那么它们应该会形成一个 VNode Tree
1
2
3
4
5
6
7
8<div>
<p>
<i>哈哈哈</i>
<a>嘿嘿嘿</a>
</p>
<span>嘻嘻嘻</span>
<strong>呵呵呵</strong>
</div>graph TD; div-->p-->i; p-->a div-->span; div-->strong;
插入 F 的案例
我们先来看一个案例:这个案例是当我点击按钮时会在中间插入一个 f
1
2
3
4
5
6
7
8
9
10
11
12
13
14
15
16
17
18
19
20
21
22<script src="https://cdn.staticfile.org/vue/3.0.5/vue.global.js"></script>
<div id="app">
<ul>
<li v-for="item in letters">{{ item }}</li>
</ul>
<button @click="insertF">insert f</button>
</div>
<script>
Vue.createApp({
data() {
return { letters: ["a", "b", "c", "d", "e"] };
},
methods: {
insertF() {
this.letters.splice(2, 0, "f");
},
},
}).mount("#app");
</script>我们可以确定的是,这次更新对于 ul 和 button 是不需要进行更新,需要更新的是我们 li 的列表
- 在 Vue 中,对于相同父元素的子元素节点并不会重新渲染整个列表
- 因为对于列表中 a、b、c、d 它们都是没有变化的
- 在操作真实 DOM 的时候,我们只需要在中间插入一个 f 的 li 即可
- 在 Vue 中,对于相同父元素的子元素节点并不会重新渲染整个列表
那么 Vue 中对于列表的更新究竟是如何操作的呢?
- Vue 事实上会对于有 key 和没有 key 会调用两个不同的方法
- 有 key,那么就使用 patchKeyedChildren 方法
- 没 key,那么久使用 patchUnkeyedChildren 方法
没 key 的过程
我们会发现下面的 diff 算法效率并不高
- c 和 d 来说它们事实上并不需要有任何的改动
- 但是因为我们的 c 被 f 所使用了,所有后续所有的内容都要一次进行改动,并且最后进行新增

有 key 的过程
第一步的操作是从头开始进行遍历、比较
- a 和 b 是一致的会继续进行比较
- c 和 f 因为 key 不一致,所以就会 break 跳出循环
第二步的操作是从尾部开始进行遍历、比较
第三步是如果旧节点遍历完毕,但是依然有新的节点,那么就新增节点
第四步是如果新的节点遍历完毕,但是依然有旧的节点,那么就移除旧节点
第五步是最特色的情况,中间还有很多未知的或者乱序的节点
所以我们可以发现,Vue 在进行 diff 算法的时候,会尽量利用我们的 key 来进行优化操作
- 在没有 key 的时候我们的效率是非常低效的
- 在进行插入或者重置顺序的时候,保持相同的 key 可以让 diff 算法更加的高效


Options API
复杂数据的处理方式
我们知道,在模板中可以直接通过插值语法显示一些data 中的数据
但是在某些情况,我们可能需要对数据进行一些转化后再显示,或者需要将多个数据结合起来进行显示
- 比如我们需要对多个数据进行运算、三元运算符来决定结果、数据进行某种转化后显示
- 在模板中使用表达式,可以非常方便的实现,但是设计它们的初衷是用于简单的运算
- 在模板中放入太多的逻辑会让模板过重和难以维护
- 并且如果多个地方都使用到,那么会有大量重复的代码
我们有没有什么方法可以将逻辑抽离出去呢?
- 可以,其中一种方式就是将逻辑抽取到一个 method 中,放到 methods 的 options 中
- 但是,这种做法有一个直观的弊端,就是所有的数据使用过程都会变成了一个方法的调用
- 另外一种方式就是使用计算属性computed
computed
什么是计算属性呢?
- 官方并没有给出直接的概念解释
- 而是说:对于任何包含响应式数据的复杂逻辑,你都应该使用计算属性
- 计算属性将被混入到组件实例中
- 所有 getter 和 setter 的 this 上下文自动地绑定为组件实例
计算属性的用法
- 选项:computed
- 类型:{ [key: string]: Function | { get: Function,set: Function } }
1
2
3
4
5
6
7
8
9
10
11
12
13
14
15
16
17
18
19
20
21
22
23
24
25
26
27
28
29
30
31
32
33
34<script src="https://cdn.staticfile.org/vue/3.0.5/vue.global.js"></script>
<div id="app">
<h2>{{ fullname }}</h2>
<h2>{{ scoreLevel }}</h2>
<h2>{{ reverseMessage }}</h2>
</div>
<script>
Vue.createApp({
data() {
return {
firstName: "张",
lastName: "三峰",
score: 80,
message: "my name is strive",
};
},
computed: {
// 1.计算属性默认对应的是一个函数
fullname() {
return this.firstName + this.lastName;
},
scoreLevel() {
return this.score >= 60 ? "及格" : "不及格";
},
reverseMessage() {
return this.message.split(" ").reverse().join(" ");
},
},
}).mount("#app");
</script>
缓存
这是什么原因呢?
- 这是因为计算属性会基于它们的依赖关系进行缓存
- 在数据不发生变化时,计算属性是不需要重新计算的
- 但是如果依赖的数据发生变化,在使用时,计算属性依然会重新进行计算
1
2
3
4
5
6
7
8
9
10
11
12
13
14
15
16
17
18
19
20
21
22
23
24
25
26
27
28
29
30
31
32
33
34
35
36
37
38
39
40
41<script src="https://cdn.staticfile.org/vue/3.0.5/vue.global.js"></script>
<div id="app">
<!-- methods -->
<h2>{{ getFullname() }}</h2>
<h2>{{ getFullname() }}</h2>
<h2>{{ getFullname() }}</h2>
<!-- computed -->
<h2>{{ fullname }}</h2>
<h2>{{ fullname }}</h2>
<h2>{{ fullname }}</h2>
<!-- 修改 lastname 值 -->
<button @click="changeLastname">changeLastname</button>
</div>
<script>
Vue.createApp({
data() {
return { firstName: "张", lastName: "三" };
},
methods: {
getFullname() {
console.log("methods getFullname");
return this.firstName + this.lastName;
},
changeLastname() {
this.lastName = "三峰";
},
},
computed: {
fullname() {
console.log("computed fullname");
return this.firstName + this.lastName;
},
},
}).mount("#app");
</script>
setter、getter
计算属性在大多数情况下,只需要一个getter 方法即可,所以我们会将计算属性直接写成一个函数
但是,如果我们确实想设置计算属性的值呢?
- 这个时候我们也可以给计算属性设置一个setter 的方法
1
2
3
4
5
6
7
8
9
10
11
12
13
14
15
16
17
18
19
20
21
22
23
24
25
26
27
28
29
30
31
32
33
34
35
36
37
38
39<script src="https://cdn.staticfile.org/vue/3.0.5/vue.global.js"></script>
<div id="app">
<h2>{{ fullName }}</h2>
<button @click="setFullname">setFullname</button>
</div>
<script>
Vue.createApp({
data() {
return { firstName: "李", lastName: "四" };
},
methods: {
setFullname() {
this.fullName = "张-三峰";
},
},
computed: {
// 完整的写法
fullName: {
get() {
return this.firstName + "-" + this.lastName;
},
set(value) {
const names = value.split("-");
this.firstName = names[0];
this.lastName = names[1];
},
},
// 语法糖的写法
// fullName() {
// return this.firstName + "-" + this.lastName;
// },
},
}).mount("#app");
</script>错误写法
1
2
3
4
5
6
7
8
9
10
11
12
13
14
15
16
17
18
19
20
21
22
23
24
25
26
27
28
29
30
31
32
33
34
35
36
37
38
39
40
41
42<script src="https://cdn.staticfile.org/vue/3.0.5/vue.global.js"></script>
<div id="app">
<h2>{{ message }}</h2>
<h2>{{ fullname1('fullname1') }}</h2>
<h2>{{ fullname2 }}</h2>
<button @click="setMessage">setMessage</button>
</div>
<script>
Vue.createApp({
data() {
return { message: "你好啊,世界" };
},
methods: {
setMessage() {
this.message = Math.random();
},
newFunction() {
console.log("---newFunction---");
return "fullname2";
},
},
computed: {
// 不会缓存
fullname1() {
return (value) => {
console.log("---fullname1---");
return value;
};
},
fullname2() {
console.log("---fullname2---");
return this.newFunction();
},
},
}).mount("#app");
</script>
watch
什么是侦听器呢?
- 开发中我们在 data 返回的对象中定义了数据,这个数据通过插值语法等方式绑定到 template 中
- 当数据变化时,template 会自动进行更新来显示最新的数据
- 但是在某些情况下,我们希望在代码逻辑中监听某个数据的变化,这个时候就需要用侦听器 watch来完成了
侦听器的用法
- 选项:watch
- 类型:{ [key: string]: string | Function | Object | Array }
1
2
3
4
5
6
7
8
9
10
11
12
13
14
15
16
17
18
19
20
21
22
23
24
25
26
27
28
29
30
31
32
33
34
35
36
37
38
39
40<script src="https://cdn.staticfile.org/vue/3.0.5/vue.global.js"></script>
<div id="app">
<h2>{{ message }}</h2>
<button @click="changeMessage">changeMessage</button>
<button @click="changeInfo">changeInfo</button>
</div>
<script>
Vue.createApp({
data() {
return { message: "Hello,Vue", info: { name: "strive", age: 18 } };
},
methods: {
changeMessage() {
this.message = "Hello,JavaScript";
},
changeInfo() {
// this.info.name = "张三";
this.info = { name: "张三", age: 20 };
},
},
watch: {
// 默认有两个参数: newValue/oldValue
message(newValue, oldValue) {
console.log("message:", newValue, oldValue);
},
info(newValue, oldValue) {
// 如果是对象类型, 那么拿到的是代理对象
console.log("info:", newValue, oldValue);
console.log(newValue.name, oldValue.name);
// 获取原生对象
console.log(Vue.toRaw(newValue));
},
},
}).mount("#app");
</script>
配置选项
我们先来看一个例子
- 当我们点击按钮的时候会修改 info.name 的值
- 这个时候我们使用watch 来侦听 info,可以侦听到吗?答案是不可以
这是因为默认情况下,watch 只是在侦听 info 的引用变化,对于内部属性的变化是不会做出响应的
- 这个时候我们可以使用一个选项 deep进行更深层的侦听
- 注意前面我们说过 watch 里面侦听的属性对应的也可以是一个 Object
还有另外一个属性,是希望一开始的就会立即执行一次
- 这个时候我们使用immediate 选项
- 这个时候无论后面数据是否有变化,侦听的函数都会有限执行一次
1
2
3
4
5
6
7
8
9
10
11
12
13
14
15
16
17
18
19
20
21
22
23
24
25
26
27
28
29
30
31
32
33
34
35
36
37<script src="https://cdn.staticfile.org/vue/3.0.5/vue.global.js"></script>
<div id="app">
<h2>{{ info.name }}</h2>
<button @click="changeInfo">changeInfo</button>
</div>
<script>
Vue.createApp({
data() {
return { info: { name: "strive", age: 18 } };
},
methods: {
changeInfo() {
this.info.name = "张三";
},
},
watch: {
info: {
handler(newValue, oldValue) {
console.log("info:", newValue, oldValue);
console.log(newValue === oldValue);
},
// 进行深度监听
deep: true,
// 第一次渲染直接执行一次监听器
immediate: true,
},
"info.name": function (newValue, oldValue) {
console.log("name:", newValue, oldValue);
},
},
}).mount("#app");
</script>
其他方式
字符串方法名
1
2
3
4
5
6
7
8
9
10
11
12
13
14
15
16
17
18
19
20
21
22
23
24
25<script src="https://cdn.staticfile.org/vue/3.0.5/vue.global.js"></script>
<div id="app">
<h2>{{ message }}</h2>
<button @click="changeMessage">changeMessage</button>
</div>
<script>
Vue.createApp({
data() {
return { message: "Hello,Vue" };
},
methods: {
changeMessage() {
this.message = "Hello,JavaScript";
},
someMethod(newValue, oldValue) {
console.log("message:", newValue, oldValue);
},
},
watch: { message: "someMethod" },
}).mount("#app");
</script>回调数组,它们会被逐一调用
1
2
3
4
5
6
7
8
9
10
11
12
13
14
15
16
17
18
19
20
21
22
23
24
25
26
27
28
29
30
31
32
33
34
35
36
37
38
39<script src="https://cdn.staticfile.org/vue/3.0.5/vue.global.js"></script>
<div id="app">
<h2>{{ message }}</h2>
<button @click="changeMessage">changeMessage</button>
</div>
<script>
Vue.createApp({
data() {
return { message: "Hello,Vue" };
},
methods: {
changeMessage() {
this.message = "Hello,JavaScript";
},
someMethod() {
console.log(1);
},
},
watch: {
message: [
"someMethod",
function test1() {
onsole.log(2);
},
{
handler() {
console.log(3);
},
},
],
},
}).mount("#app");
</script>$watch
我们可以在 created 的生命周期中,使用 this.$watch 来侦听
第一个参数是要侦听的源
第二个参数是侦听的回调函数 callback
第三个参数是额外的其他选项,比如 deep、immediate
1
2
3
4
5
6
7
8
9
10
11
12
13
14
15
16
17
18
19
20
21
22
23
24
25
26
27
28
29
30<script src="https://cdn.staticfile.org/vue/3.0.5/vue.global.js"></script>
<div id="app">
<h2>{{ message }}</h2>
<button @click="changeMessage">changeMessage</button>
</div>
<script>
Vue.createApp({
data() {
return { message: "Hello,Vue" };
},
created() {
this.$watch(
"message",
(newValue, oldValue) => {
console.log("message:", newValue, oldValue);
},
{ deep: true }
);
},
methods: {
changeMessage() {
this.message = "Hello,Node.js";
},
},
}).mount("#app");
</script>
v-model
表单提交是开发中非常常见的功能,也是和用户交互的重要手段
- 比如用户在登录、注册时需要提交账号密码
- 比如用户在检索、创建、更新信息时,需要提交一些数据
这些都要求我们可以在代码逻辑中获取到用户提交的数据,我们通常会使用v-model 指令来完成
- v-model 指令可以在表单 input、textarea 以及 select 元素上创建双向数据绑定
- 它会根据控件类型自动选取正确的方法来更新元素
- 尽管有些神奇,但 v-model 本质上不过是语法糖,它负责监听用户的输入事件来更新数据,并在某种极端场景下进行一些特殊处理
1
2
3
4
5
6
7
8
9
10
11
12
13
14
15<script src="https://cdn.staticfile.org/vue/3.0.5/vue.global.js"></script>
<div id="app">
<input type="text" v-model="message" />
<h2>{{ message }}</h2>
</div>
<script>
Vue.createApp({
data() {
return { message: "Hello,Model" };
},
}).mount("#app");
</script>
原理
官方有说到,v-model 的原理其实是背后有两个操作
- v-bind 绑定 value 属性的值
- v-on 绑定 input 事件监听到函数中,函数会获取最新的值赋值到绑定的属性中
1
2
3<input V-model="searchText" />
<!-- 等价于 -->
<input :value-"searchText" @input="searchText = $event.target.value" />
lazy
lazy 修饰符是什么作用呢?
- 默认情况下,v-model 在进行双向绑定时,绑定的是input 事件,那么会在每次内容输入后就将最新的值和绑定的属性进行同步
- 如果我们在 v-model 后跟上 lazy 修饰符,那么会将绑定的事件切换为 change 事件,只有在提交时(比如回车)才会触发
1
2
3
4
5
6
7
8
9
10
11
12
13
14
15<script src="https://cdn.staticfile.org/vue/3.0.5/vue.global.js"></script>
<div id="app">
<input type="text" v-model.lazy="message" />
<h2>{{ message }}</h2>
</div>
<script>
Vue.createApp({
data() {
return { message: "Hello,Model" };
},
}).mount("#app");
</script>
number
如果我们希望转换为数字类型,那么可以使用 .number 修饰符
1
2
3
4
5
6
7
8
9
10
11
12
13
14
15
16
17
18
19
20
21<script src="https://unpkg.com/vue@next"></script>
<div id="app">
<input type="text" v-model="counter0" />
<h2>counter{{ counter0 }} - {{ typeof counter0 }}</h2>
<!-- 自动将内容转换成数字 -->
<input type="text" v-model.number="counter1" />
<h2>counter{{ counter1 }} - {{ typeof counter1 }}</h2>
<input type="number" v-model="counter2" />
<h2>counter2{{ counter2 }} - {{ typeof counter2 }}</h2>
</div>
<script>
Vue.createApp({
data() {
return { counter0: "", counter1: "", counter2: "" };
},
}).mount("#app");
</script>
trim
如果要自动过滤用户输入的守卫空白字符,可以给 v-model 添加 .trim 修饰符
1
2
3
4
5
6
7
8
9
10
11
12
13
14
15<script src="https://cdn.staticfile.org/vue/3.0.5/vue.global.js"></script>
<div id="app">
<input type="text" v-model.trim="message" />
<h2>{{ message }}</h2>
</div>
<script>
Vue.createApp({
data() {
return { message: "Hello,Model" };
},
}).mount("#app");
</script>
Vue 组件化
人处理问题的方式
- 人面对复杂问题的处理方式
- 任何一个人处理信息的逻辑能力都是有限的
- 所以,当面对一个非常复杂的问题时,我们不太可能一次性搞定一大堆的内容
- 但是,我们人有一种天生的能力,就是将问题进行拆解
- 如果将一个复杂的问题,拆分成很多个可以处理的小问题,再将其放在整体当中,你会发现大的问题也会迎刃而解
认识组件化开发
- 组件化也是类似的思想
- 如果我们将一个页面中所有的处理逻辑全部放在一起,处理起来就会变得非常复杂,而且不利于后续的管理以及扩展
- 但如果,我们将一个页面拆分成一个个小的功能块,每个功能块完成属于自己这部分独立的功能,那么之后整个页面的管理和维护就变得非常容易了
- 如果我们将一个个功能块拆分后,就可以像搭建积木一下来搭建我们的项目
组件化开发
- 现在可以说整个的大前端开发都是组件化的天下
- 无论从三大框架(Vue、React、Angular)还是跨平台方案的Flutter,甚至是移动端都在转向组件化开发,包括小程序的开发也是采用组件化开发的思想
- 所以,学习组件化最重要的是它的思想,每个框架或者平台可能实现方法不同,但是思想都是一样的
- 我们需要通过组件化的思想来思考整个应用程序
- 我们将一个完整的页面分成很多个组件
- 每个组件都用于实现页面的一个功能块
- 而每一个组件又可以进行细分
- 而组件本身又可以在多个地方进行复用
Vue 的组件化
组件化是 Vue、React、Angular 的核心思想
- 前面我们的 createApp 函数传入了一个对象,这个对象其实本质上就是一个组件,也是我们应用程序的根组件
- 组件化提供了一种抽象,让我们可以开发出一个个独立可复用的小组件来构造我们的应用
- 任何的应用都会被抽象成一颗组件树

注册组件的方式
如果我们现在有一部分内容(模板、逻辑等),我们希望将这部分内容抽取到一个独立的组件中去维护,这个时候如何注册一个组件呢?
注册组件分成两种
全局组件:在任何其他的组件中都可以使用的组件
局部组件:只有在注册的组件中才能使用的组件
全局组件
全局组件需要使用我们全局创建的app 来注册组件
通过component 方法传入组件名称、组件对象即可注册一个全局组件了
之后,我们可以在App 组件的 template 中直接使用这个全局组件
1
2
3
4
5
6
7
8
9
10
11
12
13
14
15
16
17
18
19
20
21
22
23
24
25
26
27
28<script src="https://cdn.staticfile.org/vue/3.0.5/vue.global.js"></script>
<div id="app">
<h2>{{ message }}</h2>
<component-one></component-one>
</div>
<template id="componentA">
<h2>{{ title }}</h2>
</template>
<script>
const app = Vue.createApp({
data() {
return { message: "Hello,Vue" };
},
});
app.component("component-one", {
template: "#componentA",
data() {
return { title: "组件A" };
},
});
app.mount("#app");
</script>
组件的名称
- 在通过 app.component 注册一个组件的时候,第一个参数是组件的名称,定义组件名的方式有两种
- 方式一:使用 kebab-case(短横线分割符)
- 当使用 kebab-case (短横线分隔命名) 定义一个组件时,你也必须在引用这个自定义元素时使用 kebab-case,例如
<my-component-name>
- 当使用 kebab-case (短横线分隔命名) 定义一个组件时,你也必须在引用这个自定义元素时使用 kebab-case,例如
- 方式二:使用 PascalCase(驼峰标识符)
- 当使用 PascalCase (首字母大写命名) 定义一个组件时,你在引用这个自定义元素时两种命名法都可以使用
- 也就是说
<my-component-name>和<MyComponentName>都是可接受的
局部组件
全局组件往往是在应用程序一开始就会全局组件完成,那么就意味着如果某些组件我们并没有用到,也会一起被注册
- 比如我们注册了三个全局组件:ComponentA、ComponentB、ComponentC
- 在开发中我们只使用了ComponentA、ComponentB,如果ComponentC 没有用到但是我们依然在全局进行了注册,那么就意味着类似于 webpack 这种打包工具在打包我们的项目时,我们依然会对其进行打包
- 这样最终打包出的 JavaScript 包就会有关于 ComponentC 的内容,用户在下载对应的 JavaScript 时也会增加包的大小
所以在开发中我们通常使用组件的时候采用的都是局部注册
- 局部注册是在我们需要使用到的组件中,通过components 属性选项来进行注册
- 比如之前的 App 组件中,我们有 data、computed、methods 等选项了,事实上还可以有一个components 选项
- 该 components 选项对应的是一个对象,对象中的键值对是 组件的名称: 组件对象
1
2
3
4
5
6
7
8
9
10
11
12
13
14
15
16
17
18
19
20
21
22
23
24
25
26
27
28
29<script src="https://cdn.staticfile.org/vue/3.0.5/vue.global.js"></script>
<div id="app">
<h2>{{ message }}</h2>
<component-one></component-one>
</div>
<template id="componentA">
<h2>{{ title }}</h2>
</template>
<script>
const componentOne = {
template: "#componentA",
data() {
return { title: "组件A" };
},
};
const app = Vue.createApp({
data() {
return { message: "Hello,Vue" };
},
components: { componentOne },
});
app.mount("#app");
</script>
Vue 的开发模式
- 目前我们使用 vue 的过程都是在 html 文件中,通过template 编写自己的模板、脚本逻辑、样式等
- 但是随着项目越来越复杂,我们会采用组件化的方式来进行开发
- 这就意味着每个组件都会有自己的模板、脚本逻辑、样式等
- 当然我们依然可以把它们抽离到单独的 js、css 文件中,但是它们还是会分离开来
- 也包括我们的 script 是在一个全局的作用域下,很容易出现命名冲突的问题
- 并且我们的代码为了适配一些浏览器,必须使用 ES5 的语法
- 在我们编写代码完成之后,依然需要通过工具对代码进行构建、代码
- 所以在真实开发中,我们可以通过一个后缀名为 .vue 的 single-file-components (单文件组件) 来解决,并且可以使用 webpack 或者 vite 或者 rollup 等构建工具来对其进行处理
Vue CLI 脚手架
- 什么是 Vue 脚手架?
- 脚手架其实是建筑工程中的一个概念,在我们软件工程中也会将一些帮助我们搭建项目的工具称之为脚手架
- Vue 的脚手架就是 Vue CLI
- CLI 是Command-Line Interface,翻译为命令行界面
- 我们可以通过 CLI选择项目的配置和创建出我们的项目
- Vue CLI 已经内置了 webpack 相关的配置,我们不需要从零来配置
安装和使用
安装 Vue CLI(目前最新的版本是 v5.0.8)
- 我们是进行全局安装,这样在任何时候都可以通过 vue 的命令来创建项目
1
npm install @vue/cli -g
升级 Vue CLI
- 如果是比较旧的版本,可以通过下面的命令来升级
1
2
npm update @vue/cli -g
# npm install @vue/cli -g 重新在安装通过 Vue 的命令来创建项目 Vue CLI 安装和使用
1
Vue create 项目的名称
项目的目录结构
jsconfig.json
- 作用:给 VSCode 来进行读取,VSCode 在读取到其中的内容时,给我们的代码更加友好的提示
1
2
3
4
5
6
7
8
9
10
11
12
13
{
"compilerOptions": {
"target": "es5",
"module": "esnext",
"baseUrl": "./",
"moduleResolution": "node",
"paths": {
// 当你输入 "@/" 时,VSCode就知道你是要找 "src" 目录下的某个文件/文件夹
"@/*": ["src/*"]
},
"lib": ["esnext", "dom", "dom.iterable", "scripthost"]
}
}main.js
1
2
3
4
5
6
7
8
9
10
11
12
13
14
15
16
17
18
19
20
import { createApp } from "vue"; // 不支持 template 选项, 因为没有 compile 的代码
// import { createApp } from "vue/dist/vue.esm-bundler"; // 有 compile 的代码
import App from "./App.vue"; // vue-loader --解析--> template --转成--> createVNode
/*
引入的 vue 的版本
默认 vue 版本: 只有 runtime 的代码, vue-loader 解析 template 的编译过程
vue.esm-bundler: 有 runtime + compile 的代码, 可以对 template 进行编译
const App = {
template: `<h2>Hello Vue3 App</h2>`,
data() {
return {};
},
};
*/
createApp(App).mount("#app");
Vue CLI 的运行原理
组件间通信
- 在开发过程中,我们会经常遇到需要组件之间相互进行通信
- 比如父组件可能使用了多个子组件,每个地方的子组件展示的内容不同,那么我们就需要传递给子组件一些数据,让其进行展示
- 也可能是子组件中发生了事件,需要由父组件来完成某些操作,那就需要子组件向父组件传递事件
父子组件之间通信的方式
父子组件之间如何进行通信呢?
- 父组件传递给子组件:通过 props 属性
- 子组件传递给父组件:通过$emit 触发事件

父传子
在开发中很常见的就是父子组件之间通信,比如父组件有一些数据,需要子组件来进行展示
- 这个时候我们可以通过 props 来完成组件之间的通信
什么是 Props 呢?
- Props 是你可以在组件上注册一些自定义的属性
- 父组件给这些属性赋值,子组件通过属性的名称获取到对应的值
Props 有两种常见的用法
- 方式一:字符串数组,数组中的字符串就是属性的名称
1
2
3
4
5
6
7
8
9
10
11<template>
<show-info name="strive" :age="20" :height="1.83" />
</template>
<script>
import ShowInfo from "./ShowInfo.vue";
export default {
components: { ShowInfo },
};
</script>1
2
3
4
5
6
7
8
9
10
11
12
13
14
15
16<template>
<div>
<h2>姓名: {{ name }}</h2>
<h2>年龄: {{ age }}</h2>
<h2>身高: {{ height }}</h2>
</div>
</template>
<script>
export default {
// 弊端:
// 1.不能对类型进行验证
// 2.没有默认值的
props: ["name", "age", "height"],
};
</script>- 方式二:对象类型,对象类型我们可以在指定属性名称的同时,指定它需要传递的类型、是否是必须的、默认值等等
1
2
3
4
5
6
7
8
9
10
11
12
13<template>
<show-info name="strive" :age="20" :height="1.83" show-message="哈哈哈哈" />
<hr />
<show-info :age="30" />
</template>
<script>
import ShowInfo from "./ShowInfo.vue";
export default {
components: { ShowInfo },
};
</script>1
2
3
4
5
6
7
8
9
10
11
12
13
14
15
16
17
18
19
20
21
22
23
24
25
26<template>
<div>
<h2>姓名: {{ name }}</h2>
<h2>年龄: {{ age }}</h2>
<h2>身高: {{ height }}</h2>
<h2>Message: {{ showMessage }}</h2>
</div>
</template>
<script>
export default {
// 对象语法
// type 类型: String Number Boolean Array Object Date Function Symbol
props: {
name: { type: String, default: "默认名称" },
age: { type: Number, required: true },
height: { type: Number, default: 1.88 },
showMessage: { type: String, default: "默认信息" },
// 重要的原则: 对象类型写默认值时, 需要编写default的函数, 函数返回默认值
// friend: { type: Object, default: () => ({ name: "self" }) },
// hobbies: { type: Array, default: () => ["唱", "跳", "rap", "篮球"] },
},
};
</script>
prop 的大小写命名
prop 的大小写命名(camelCase vs kebab-case)
- HTML 中的 attribute 名是大小写不敏感的,所以浏览器会把所有大写字符解释为小写字符
- 这意味着当你使用 DOM 中的模板时,camelCase (驼峰命名法) 的 prop 名需要使用其等价的 kebab-case (短横线分隔命名) 命名
1
2<show-info :age="10" showMessage="message - 1" />
<show-info :age="10" show-message="message - 2" />
非 prop 的属性
什么是非 prop 的属性呢?
- 当我们传递给一个组件某个属性,但是该属性并没有定义对应的 props 或者 emits时,就称之为非 prop 的属性
- 常见的包括class、style、id属性等
属性继承
- 当组件有单个根节点时,非 prop 的属性将自动添加到根节点的属性中
1
<show-info :age="20" aaa="bbb" class="active" />
1
2
3
4
5
6
7
8
9
10<template>
<div>
<!-- aaa="bbb" class="active"-->
<h2>姓名: {{ name }}</h2>
<h2>年龄: {{ age }}</h2>
<h2>身高: {{ height }}</h2>
<h2>Message: {{ showMessage }}</h2>
</div>
</template>
禁用属性继承和多根节点
如果我们不希望组件的根元素继承属性,可以在组件中设置 inheritAttrs: false
- 禁用属性继承的常见情况是需要将属性应用于根元素之外的其他元素
- 我们可以通过 $attrs 来访问所有的非 props 的属性
1
2
3<template>
<div :class="$attrs.class"></div>
</template>多个根节点的属性
- 多个根节点的属性如果没有显示的绑定,那么会报警告,我们必须手动的指定要绑定到哪一个属性上
1
2
3
4<template>
<div class="root-1"></div>
<div class="root-2" v-bind="$attrs"></div>
</template>
子传父
什么情况下子组件需要传递内容到父组件呢?
- 当子组件有一些事件发生的时候,比如在组件中发生了点击,父组件需要切换内容
- 子组件有一些内容想要传递给父组件的时候
我们如何完成上面的操作呢?
- 首先,我们需要在子组件中定义好在某些情况下触发的事件名称
- 其次,在父组件中以 v-on 的方式传入要监听的事件名称,并且绑定到对应的方法中
- 最后,在子组件中发生某个事件的时候,根据事件名称触发对应的事件
1
2
3
4
5
6
7
8
9
10
11
12
13
14
15
16
17
18
19
20
21
22<template>
<div>
<h2>{{ counter }}</h2>
<add-counter @add="addBtnClick"></add-counter>
</div>
</template>
<script>
import AddCounter from "./AddCounter.vue";
export default {
components: { AddCounter },
data() {
return { counter: 0 };
},
methods: {
addBtnClick(count) {
this.counter += count;
},
},
};
</script>1
2
3
4
5
6
7
8
9
10
11
12
13
14
15
16
17
18
19
20
21
22
23
24
25
26<template>
<div>
<button @click="btnClick(1)">+1</button>
</div>
</template>
<script>
export default {
// 数组语法
emits: ["add"],
// 对象语法
// emits: {
// add(count) {
// if (count <= 10) {
// return true
// }
// return false
// }
// },
methods: {
btnClick(count) {
this.$emit("add", count);
},
},
};
</script>
插槽
认识插槽
- 在开发中,我们会经常封装一个个可复用的组件
- 前面我们会通过 props 传递给组件一些数据,让组件来进行展示
- 但是为了让这个组件具备更强的通用性,我们不能将组件中的内容限制为固定的 div、span等等这些元素
- 比如某种情况下我们使用组件,希望组件显示的是一个按钮,某种情况下我们使用组件希望显示的是一张图片
- 我们应该让使用者可以决定某一块区域到底存放什么内容和元素
- 举个栗子:假如我们定制一个通用的导航组件 - NavBar
- 这个组件分成三块区域:左边-中间-右边,每块区域的内容是不固定
- 左边区域可能显示一个菜单图标,也可能显示一个返回按钮,可能什么都不显示
- 中间区域可能显示一个搜索框,也可能是一个列表,也可能是一个标题,等等
- 右边可能是一个文字,也可能是一个图标,也可能什么都不显示
使用插槽
这个时候我们就可以来定义插槽
- 插槽的使用过程其实是抽取共性、预留不同
- 我们会将共同的元素、内容依然在组件内进行封装
- 同时会将不同的元素使用 slot 作为占位,让外部决定到底显示什么样的元素
如何使用 slot 呢?
- Vue 中将
<slot>元素作为承载分发内容的出口 - 在封装组件中,使用特殊的元素
<slot>就可以为封装组件开启一个插槽 - 该插槽插入什么内容取决于父组件如何使用
1
2
3
4
5
6
7
8
9
10
11
12
13
14
15
16
17
18
19
20
21<template>
<div>
<show-message title="标题-1">
<button>按钮</button>
</show-message>
<show-message title="标题-1">
<a href="#">超链接</a>
</show-message>
<show-message></show-message>
</div>
</template>
<script>
import ShowMessage from "./ShowMessage.vue";
export default {
components: { ShowMessage },
};
</script>1
2
3
4
5
6
7
8
9
10
11
12
13
14
15
16
17
18<template>
<h2>{{ title }}</h2>
<div class="content">
<!-- 有时候我们希望在使用插槽时,如果没有插入对应的内容,那么我们需要显示一个默认的内容 -->
<!-- 当然这个默认的内容只会在没有提供插入的内容时,才会显示 -->
<slot>
<p>默认内容, 哈哈哈</p>
</slot>
</div>
</template>
<script>
export default {
props: {
title: { type: String, default: "title 默认值" },
},
};
</script>- Vue 中将

多个插槽的效果
我们先测试一个知识点:如果一个组件中含有多个插槽,我们插入多个内容时是什么效果?
- 我们会发现默认情况下每个插槽都会获取到我们插入的内容来显示
1
2
3
4
5
6
7
8
9
10
11
12
13
14
15<template>
<nav-bar>
<button>按钮</button>
<a href="#">超链接</a>
<strong>strong</strong>
</nav-bar>
</template>
<script>
import NavBar from "./NavBar.vue";
export default {
components: { NavBar },
};
</script>1
2
3
4
5
6
7
8
9
10
11
12
13
14
15<template>
<div class="nav-bar">
<div class="left">
<slot></slot>
</div>
<div class="center">
<slot></slot>
</div>
<div class="right">
<slot></slot>
</div>
</div>
</template>
具名插槽的使用
事实上,我们希望达到的效果是插槽对应的显示,这个时候我们就可以使用具名插槽
- 具名插槽顾名思义就是给插槽起一个名字
<slot>元素有一个特殊的 attribute:name - 一个不带 name 的 slot,会带有隐含的名字 default
1
2
3
4
5
6
7
8
9
10
11
12
13
14
15
16
17
18
19
20
21
22
23<template>
<nav-bar>
<template v-slot:left>
<button>按钮</button>
</template>
<template v-slot:center>
<a href="#">超链接</a>
</template>
<template v-slot:right>
<strong>strong</strong>
</template>
</nav-bar>
</template>
<script>
import NavBar from "./NavBar.vue";
export default {
components: { NavBar },
};
</script>1
2
3
4
5
6
7
8
9
10
11
12
13
14
15<template>
<div class="nav-bar">
<div class="left">
<slot name="left"></slot>
</div>
<div class="center">
<slot name="center"></slot>
</div>
<div class="right">
<slot name="right"></slot>
</div>
</div>
</template>- 具名插槽顾名思义就是给插槽起一个名字
具名插槽的缩写
- 具名插槽使用的时候缩写
- 跟 v-on 和 v-bind 一样,v-slot 也有缩写
- 即把参数之前的所有内容 (v-slot:) 替换为字符 #
动态插槽名
什么是动态插槽名呢?
- 目前我们使用的插槽名称都是固定的
- 比如 v-slot:left、v-slot:center 等等
- 我们可以通过 v-slot:[dynamicSlotName] 方式动态绑定一个名称
1
2
3
4
5
6
7
8
9
10
11
12
13
14
15
16
17
18
19<template>
<!-- 只能放一个变量,不支持缩写 -->
<nav-bar>
<template v-slot:[position]>
<a href="#">{{ text }}</a>
</template>
</nav-bar>
</template>
<script>
import NavBar from "./NavBar.vue";
export default {
components: { NavBar },
data() {
return { position: "center", text: "超链接" };
},
};
</script>
渲染作用域
- 在 Vue 中有渲染作用域的概念
- 父级模板里的所有内容都是在父级作用域中编译的
- 子模板里的所有内容都是在子作用域中编译的
- 如何理解这句话呢?我们来看一个案例
- 在我们的案例中 NavBar 自然是可以访问自己作用域中的 data 内容的
- 但是在 App 中,是访问不了 NavBar 中的内容的,因为它们是跨作用域的访问
作用域插槽
但是有时候我们希望插槽可以访问到子组件中的内容是非常重要的
- 这个 Vue 给我们提供了作用域插槽
1
2
3
4
5
6
7
8
9
10
11
12
13
14
15
16
17
18<template>
<nav-bar>
<template #default="props">
<div>{{ props.name }}</div>
<div>{{ props.age }}</div>
<div>{{ props.height }}</div>
<div>{{ props.abc }}</div>
</template>
</nav-bar>
</template>
<script>
import NavBar from "./NavBar.vue";
export default {
components: { NavBar },
};
</script>1
2
3
4
5
6
7
8
9
10
11
12
13
14
15<template>
<div>
<slot v-bind="info" abc="哈哈哈"></slot>
</div>
</template>
<script>
export default {
data() {
return {
info: { name: "strive", age: 18, height: 1.83 },
};
},
};
</script>
独占默认插槽的缩写
如果我们的插槽是默认插槽 default,那么在使用的时候 v-slot:default=“props” 可以简写为 v-slot=“props”
并且如果我们的插槽只有默认插槽时,组件的标签可以被当做插槽的模板来使用,这样,我们就可以将 v-slot 直接用在组件上
1
2
3
4
5
6
7
8
9<template>
<nav-bar>
<template v-slot="props"></template>
</nav-bar>
</template>
<template>
<nav-bar v-slot="props"></nav-bar>
</template>但是,如果我们有默认插槽和具名插槽,那么按照完整的 template 来编写
只要出现多个插槽,请始终为所有的插槽使用完整的基于
<template>的语法
非父子组件的通信
- 在开发中,我们构建了组件树之后,除了父子组件之间的通信之外,还会有非父子组件之间的通信
- 这里我们主要讲两种方式
- 全局事件总线
- Vue3 从实例中移除了 $on、$off 和 $once 方法,所以我们如果希望继续使用全局事件总线,要通过第三方的库
- Vue3 官方有推荐一些库,例如 mitt 或 tiny-emitter
- Provide/Inject
- 全局事件总线
Provide 和 Inject
Provide/Inject 用于非父子组件之间共享数据
- 比如有一些深度嵌套的组件,子组件想要获取父组件的部分内容
- 在这种情况下,如果我们仍然将 props 沿着组件链逐级传递下去,就会非常的麻烦
对于这种情况下,我们可以使用 Provide 和 Inject
- 无论层级结构有多深,父组件都可以作为其所有子组件的依赖提供者
- 父组件有一个 provide 选项来提供数据
- 子组件有一个 inject 选项来开始使用这些数据
实际上,你可以将依赖注入看作是 “long range props” 除了
- 父组件不需要知道哪些子组件使用它 provide 的 property
- 子组件不需要知道 inject 的 property 来自哪里
1
2
3
4
5
6
7
8
9
10
11
12
13
14
15
16
17
18
19
20
21<template>
<div>
<h2>App: {{ message }}</h2>
<home></home>
<button @click="message = 'hello world'">setMessage</button>
</div>
</template>
<script>
import Home from "./Home.vue";
export default {
components: { Home },
data() {
return { message: "Hello App" };
},
provide() {
return { name: "strive", age: 18, message: this.message };
},
};
</script>1
2
3
4
5
6
7
8
9
10
11<template>
<div>
<h2>Home: {{ name }} - {{ age }} - {{ message }}</h2>
</div>
</template>
<script>
export default {
inject: ["name", "age", "message"],
};
</script>

处理响应式数据
我们先来验证一个结果:如果我们修改了 this.message 的内容,那么使用 message 的子组件会不会是响应式的?
我们会发现对应的子组件中是没有反应的
- 这是因为当我们修改了 message 之后,之前在 provide 中引入的 this.message 本身并不是响应式的
那么怎么样可以让我们的数据变成响应式的呢?
- 非常的简单,我们可以使用响应式的一些 API来完成这些功能,比如说computed 函数
- 当然,这个 computed 是vue3 的新特性
注意:我们在使用 message 的时候需要获取其中的 value
- 这是因为computed 返回的是一个 ref 对象,需要取出其中的value 来使用
1
2
3
4
5
6
7
8
9
10
11
12
13
14
15
16
17
18
19
20
21
22
23
24
25
26<template>
<div>
<h2>App: {{ message }}</h2>
<home></home>
<button @click="message = 'hello world'">setMessage</button>
</div>
</template>
<script>
import { computed } from "vue";
import Home from "./Home.vue";
export default {
components: { Home },
data() {
return { message: "Hello App" };
},
provide() {
return {
name: "strive",
age: 18,
message: computed(() => this.message),
};
},
};
</script>1
2
3
4
5
6
7
8
9
10
11<template>
<div>
<h2>Home: {{ name }} - {{ age }} - {{ message.value }}</h2>
</div>
</template>
<script>
export default {
inject: ["name", "age", "message"],
};
</script>
认识生命周期
- 什么是生命周期呢?
- 生物学上,生物生命周期指得是一个生物体在生命开始到结束周而复始所历经的一系列变化过程
- 每个组件都可能会经历从创建、挂载、更新、卸载等一系列的过程
- 在这个过程中的某一个阶段,我们可能会想要添加一些属于自己的代码逻辑
- 但是我们如何可以知道目前组件正在哪一个过程呢?Vue 给我们提供了组件的生命周期函数
- 生命周期函数
- 生命周期函数是一些钩子函数(回调函数),在某个时间会被 Vue 源码内部进行回调
- 通过对生命周期函数的回调,我们可以知道目前组件正在经历什么阶段
- 那么我们就可以在该生命周期中编写属于自己的逻辑代码了
生命周期的流程

生命周期函数演练
1
2
3
4
5
6
7
8
9
10
11
12
13
14
15
16
17
18
19
20
21
22
23
24
25
26
27
28
29
30
31
32
33
34
35
36
37
38
39
40
41
42
43
44
45
46
47
48
49
50
51
52<template>
<h2>{{ counter }}</h2>
<button @click="counter++">+1</button>
<button @click="isShowHome = !isShowHome">isShowHome</button>
<Home v-if="isShowHome"></Home>
</template>
<script>
import Home from "./Home.vue";
export default {
components: { Home },
data() {
return { counter: 0, isShowHome: true };
},
// 1.组件被创建之前
beforeCreate() {
console.log("beforeCreate");
},
// 2.组件被创建完成
created() {
console.log("created");
},
// 3.组件 template 准备被挂载
beforeMount() {
console.log("beforeMount");
},
// 4.组件 template 被挂载: 虚拟DOM -> 真实DOM
mounted() {
console.log("mounted");
},
// 5.数据发生改变
// 5.1.准备更新DOM
beforeUpdate() {
console.log("beforeUpdate");
},
// 5.2.更新DOM
updated() {
console.log("updated");
},
// 6.卸载VNode -> DOM元素
// 6.1.卸载之前
beforeUnmount() {
console.log("beforeUnmount");
},
// 6.2.DOM元素被卸载完成
unmounted() {
console.log("unmounted");
},
};
</script>1
2
3
4
5
6
7
8
9
10
11
12
13
14<template>
<h2>Home</h2>
</template>
<script>
export default {
beforeUnmount() {
console.log("Home beforeUnmount");
},
unmounted() {
console.log("Home unmounted");
},
};
</script>
$refs 的使用
某些情况下,我们在组件中想要直接获取到元素对象或者子组件实例
在 Vue 开发中我们是不推荐进行原生 DOM 操作的
这个时候,我们可以给元素或者组件绑定一个 ref 的属性
组件实例有一个$refs 属性
- 它是一个对象,持有注册过 ref 属性的所有 DOM 元素和组件实例
1
2
3
4
5
6
7
8
9
10
11
12
13
14
15
16
17
18
19
20
21
22
23
24
25
26
27
28
29
30
31
32
33
34
35
36
37
38
39
40
41
42<template>
<div>
<h2 ref="title">Hello World</h2>
<button ref="btn" @click="getRefs">getRefs</button>
<Banner ref="banner" />
</div>
</template>
<script>
import Banner from "./Banner.vue";
export default {
components: { Banner },
methods: {
getRefs() {
// 获取 title/button 元素
console.log(this.$refs.title);
console.log(this.$refs.btn);
// 获取 banner 组件实例
console.log(this.$refs.banner);
// 在父组件中可以主动的调用子组件的对象方法
this.$refs.banner.bannerClick();
// 获取 banner 组件实例中的元素
console.log(this.$refs.banner.$el);
// 如果 banner template 是多个根, 拿到的是第一个 node 节点
// 注意: 开发中不推荐一个组件的 template 中有多个根元素
// console.log(this.$refs.banner.$el)
// 4.组件实例还有两个属性(了解)
// 在Vue3中已经移除了$children的属性,所以不可以使用了
console.log(this.$parent); // 获取父组件
console.log(this.$root); // 获取根组件
},
},
};
</script>1
2
3
4
5
6
7
8
9
10
11
12
13
14
15<template>
<div>
<h2>Banner</h2>
</div>
</template>
<script>
export default {
methods: {
bannerClick() {
console.log("bannerClick");
},
},
};
</script>
动态组件的实现
动态组件是使用 component 组件,通过一个特殊的属性 is 来实现
1
2
3
4
5
6
7
8
9
10
11
12
13
14
15
16
17
18
19
20
21
22
23
24
25
26
27
28
29
30
31
32
33
34
35
36
37
38
39
40<template>
<div>
<template v-for="item in tabs" :key="item">
<button @click="itemClick(item)">{{ item }}</button>
</template>
<div class="view">
<component
:is="currentTab"
name="strive"
:age="20"
@HomeBtnClick="HomeClick"
/>
</div>
</div>
</template>
<script>
import Home from "./views/Home.vue";
import About from "./views/About.vue";
import Category from "./views/Category.vue";
export default {
components: { Home, About, Category },
data() {
return {
tabs: ["home", "about", "category"],
currentTab: "home",
};
},
methods: {
itemClick(tab) {
this.currentTab = tab;
},
HomeClick(payload) {
console.log("HomeClick:", payload);
},
},
};
</script>这个 currentTab 的值需要是什么内容呢?
- 全局注册:可以是通过component 函数注册的组件
- 局部注册:在一个组件对象的 components 对象中注册的组件
1
2
3
4
5
6
7
8
9
10
11
12
13
14
15
16
17
18<template>
<div>
<h2>Home: {{ name }} - {{ age }}</h2>
<button @click="HomeBtnClick">HomeBtnClick</button>
</div>
</template>
<script>
export default {
props: ["name", "age"],
emits: ["HomeBtnClick"],
methods: {
HomeBtnClick() {
this.$emit("HomeBtnClick", "Home-Emit");
},
},
};
</script>1
2
3
4
5
6
7
8
9
10
11<template>
<div>
<h2>About</h2>
</div>
</template>
<template>
<div>
<h2>Category</h2>
</div>
</template>
认识 keep-alive
我们先对之前的案例中 Home 组件进行改造
- 在其中增加了一个按钮,点击可以递增的功能
比如我们将 counter 点到 10,那么在切换到 About 再切换回来 Home 时,状态是否可以保持呢?
- 答案是否定的
- 这是因为默认情况下,我们在切换组件后,Home 组件会被销毁掉,再次回来时会重新创建组件
但是,在开发中某些情况我们希望继续保持组件的状态,而不是销毁掉,这个时候我们就可以使用一个内置组件:keep-alive
1
2
3
4
5
6
7
8<keep-alive>
<component
:is="currentTab"
name="strive"
:age="20"
@HomeBtnClick="HomeClick"
/>
</keep-alive>
keep-alive 属性
keep-alive 有一些属性
- include - string | RegExp | Array 只有名称匹配的组件会被缓存
- exclude - string | RegExp | Array 任何名称匹配的组件都不会被缓存
- max - number | string 最多可以缓存多少组件实例,一旦达到这个数字,那么缓存组件中最近没有被访问的实例会被销毁
include 和 exclude prop 允许组件有条件地缓存
- 二者都可以用逗号分隔字符串、正则表达式或一个数组来表示
- 匹配首先检查组件自身的 name 选项
1
2
3
4
5
6
7
8
9<!-- include: 组件的名称来自于组件定义时 name 选项 -->
<keep-alive include="home,about">
<component
:is="currentTab"
name="strive"
:age="20"
@HomeBtnClick="HomeClick"
/>
</keep-alive>
缓存组件的生命周期
对于缓存的组件来说,再次进入时,我们是不会执行 created 或者 mounted 等生命周期函数的
但是有时候我们确实希望监听到何时重新进入到了组件,何时离开了组件
这个时候我们可以使用 activated 和 deactivated 这两个生命周期钩子函数来监听
1 | <template> |
Webpack 的代码分包
默认的打包过程
- 默认情况下,在构建整个组件树的过程中,因为组件和组件之间是通过模块化直接依赖的,那么webpack 在打包时就会将组件模块打包到一起
- 这个时候随着项目的不断庞大,app.js 文件的内容过大,会造成首屏的渲染速度变慢
打包时,代码的分包
- 所以,对于一些不需要立即使用的组件,我们可以单独对它们进行拆分,拆分成一些小的代码块 chunk.js
- 这些 chunk.js 会在需要时从服务器加载下来,并且运行代码,显示对应的内容
那么 webpack 中如何可以对代码进行分包呢?
1
2
3
4// import函数可以让 webpack 对导入文件进行分包处理
import("./utils/math").then((res) => {
res.sum(20, 30);
});
Vue 中实现异步组件
如果我们的项目过大了,对于某些组件我们希望通过异步的方式来进行加载,那么 Vue 中给我们提供了一个函数:defineAsyncComponent
defineAsyncComponent 接受两种类型的参数
- 类型一:工厂函数,该工厂函数需要返回一个 Promise 对象
- 类型二:接受一个对象类型,对异步函数进行配置
工厂函数类型一的写法
1
2
3
4
5
6
7
8
9
10
11<script>
import { defineAsyncComponent } from "vue";
const AsyncCategory = defineAsyncComponent(() =>
import("./views/Category.vue")
);
export default {
components: { Category: AsyncCategory },
};
</script>对象类型
1
2
3
4
5
6
7
8
9
10
11
12
13
14
15
16
17
18
19<script>
import { defineAsyncComponent } from "vue";
const AsyncCategory = defineAsyncComponent({
// 工厂函数
loader: () => import("./views/Category.vue"),
// 加载过程中显示的组件
loadingComponent: Loading,
// 加载失败时显示的组件
errorComponent: Error,
// 在显示 loadingComponent 之前的延迟 | 默认值: 200 (单位ms)
delay: 2000,
// 如果提供了 timeout,并且加载组件的时间超过了设定值,将显示错误组件
// 默认值: Infinity (即永不超时,单位ms)
// timeout: 0,
// 定义组件是否可挂起 | 默认值: true
suspensible: true,
});
</script>
组件的 v-model
前面我们在input中可以使用v-model来完成双向绑定
- 这个时候往往会非常方便,因为 v-model 默认帮助我们完成了两件事
- v-bind:value 的数据绑定和@input 的事件监听
如果我们现在封装了一个组件,其他地方在使用这个组件时,是否也可以使用 v-model 来同时完成这两个功能呢?
- 也是可以的,vue 也支持在组件上使用 v-model
当我们在组件上使用的时候,等价于如下的操作
- 我们会发现和input 元素不同的只是属性的名称和事件触发的名称而已
1
2
3
4
5
6
7<counter v-model="appCounter"></counter>
<!--相当于-->
<!--子组件内部还是要触发 update:modelValue 这个事件的-->
<counter
:modelValue="appCounter"
@update:modelValue="appCounter = $event"
></counter>
绑定多个属性
我们现在通过 v-model 是直接绑定了一个属性,如果我们希望绑定多个属性呢?
- 也就是我们希望在一个组件上使用多个 v-model是否可以实现呢?
- 我们知道,默认情况下的 v-model 其实是绑定了 modelValue 属性和 @update:modelValue 的事件
- 如果我们希望绑定更多,可以给v-model 传入一个参数,那么这个参数的名称就是我们绑定属性的名称
1
2
3
4
5
6
7
8
9
10
11
12
13
14
15
16<template>
<div>
<counter v-model:counter="appCounter" v-model:message="appMessage" />
</div>
</template>
<script>
import Counter from "./Counter.vue";
export default {
components: { Counter },
data() {
return { appCounter: 10, appMessage: "Hello World" };
},
};
</script>1
2
3
4
5
6
7
8
9
10
11
12
13
14
15
16
17
18
19
20
21
22
23
24
25
26
27<template>
<div>
<h2>Counter: {{ counter }}</h2>
<button @click="changeCounter">changeCounter</button>
<hr />
<h2>Message: {{ message }}</h2>
<button @click="changeMessage">changeMessage</button>
</div>
</template>
<script>
export default {
props: {
counter: { type: Number, default: 0 },
message: { type: String, default: "" },
},
emits: ["update:counter", "update:message"],
methods: {
changeCounter() {
this.$emit("update:counter", 999);
},
changeMessage() {
this.$emit("update:message", "Hello Vue");
},
},
};
</script>
认识 Mixin
目前我们是使用组件化的方式在开发整个 Vue 的应用程序,但是组件和组件之间有时候会存在相同的代码逻辑,我们希望对相同的代码逻辑进行抽取
在 Vue2 和 Vue3 中都支持的一种方式就是使用 Mixin 来完成
- Mixin 提供了一种非常灵活的方式,来分发 Vue 组件中的可复用功能
- 一个 Mixin 对象可以包含任何组件选项
- 当组件使用 Mixin 对象时,所有Mixin 对象的选项将被 混合 进入该组件本身的选项中
1
2
3
4
5
6
7
8
9
10
11
12
13<template>
<div>
<Home />
</div>
</template>
<script>
import Home from "./views/Home.vue";
export default {
components: { Home },
};
</script>1
2
3
4
5
6
7
8
9
10
11
12
13
14
15<template>
<h2>Home组件</h2>
</template>
<script>
import messageMixin from "../mixins/message-mixin";
export default {
mixins: [messageMixin],
created() {
console.log("Home created");
},
};
</script>1
2
3
4
5
6
7
8export default {
data() {
return { message: "Message-Mixin" };
},
created() {
console.log("Mixin created", this.message);
},
};
Mixin 的合并规则
- 如果 Mixin 对象中的选项和组件对象中的选项发生了冲突,那么 Vue 会如何操作呢?
- 这里分成不同的情况来进行处理
- 情况一:如果是 data 函数的返回值对象
- 返回值对象默认情况下会进行合并
- 如果 data 返回值对象的属性发生了冲突,那么会保留组件自身的数据
- 情况二:如何生命周期钩子函数
- 生命周期的钩子函数会被合并到数组中,都会被调用
- 情况三:值为对象的选项,例如 methods、components 和 directives,将被合并为同一个对象
- 比如都有methods 选项,并且都定义了方法,那么它们都会生效
- 但是如果对象的 key 相同,那么会取组件对象的键值对
全局混入 Mixin
如果组件中的某些选项,是所有的组件都需要拥有的,那么这个时候我们可以使用全局的 mixin
- 全局的 Mixin 可以使用 应用 app 的方法 mixin 来完成注册
- 一旦注册,那么全局混入的选项将会影响每一个组件
1
2
3
4
5
6
7const app = createApp(App);
app.mixin({
created() {
console.log("mixin created");
},
});
app.mount("#app");
Options API 的弊端
在 Vue2 中,我们编写组件的方式是 Options API
- Options API 的一大特点就是在对应的属性中编写对应的功能模块
- 比如data 定义数据、methods 中定义方法、computed 中定义计算属性、watch 中监听属性改变,也包括生命周期钩子
但是这种代码有一个很大的弊端
- 当我们实现某一个功能时,这个功能对应的代码逻辑会被拆分到各个属性中
- 当我们组件变得更大、更复杂时,逻辑关注点的列表就会增长,那么同一个功能的逻辑就会被拆分的很分散
- 尤其对于那些一开始没有编写这些组件的人来说,这个组件的代码是难以阅读和理解的(阅读组件的其他人)
下面我们来看一个非常大的组件,其中的逻辑功能按照颜色进行了划分
- 这种碎片化的代码使用理解和维护这个复杂的组件变得异常困难,并且隐藏了潜在的逻辑问题
- 并且当我们处理单个逻辑关注点时,需要不断的跳到相应的代码块中
如果我们能将同一个逻辑关注点相关的代码收集在一起会更好
这就是 Composition API 想要做的事情,以及可以帮助我们完成的事情
也有人把 Vue CompositionAPI 简称为VCA

Composition API
- 那么既然知道 Composition API 想要帮助我们做什么事情,接下来看一下到底是怎么做呢?
- 为了开始使用 Composition API,我们需要有一个可以实际使用它(编写代码)的地方
- 在 Vue 组件中,这个位置就是 setup 函数
- setup 其实就是组件的另外一个选项
- 只不过这个选项强大到我们可以用它来替代之前所编写的大部分其他选项
- 比如methods、computed、watch、data、生命周期等等
- 接下来我们一起学习这个函数的使用
- 函数的参数
- 函数的返回值
setup
- 我们先来研究一个 setup 函数的参数,它主要有两个参数
- 第一个参数:props
- 第二个参数:context
- props 非常好理解,它其实就是父组件传递过来的属性会被放到 props 对象中,我们在setup 中如果需要使用,那么就可以直接通过 props 参数获取
- 对于定义 props 的类型,我们还是和之前的规则是一样的,在 props 选项中定义
- 并且在template 中依然是可以正常去使用 props 中的属性
- 如果我们在 setup 函数中想要使用 props,那么不可以通过 this 去获取
- 因为 props 有直接作为参数传递到 setup 函数中,所以我们可以直接通过参数来使用即可
- 另外一个参数是 context,我们也称之为是一个SetupContext,它里面包含三个属性
- attrs:所有的非 prop 的 attribute
- slots:父组件传递过来的插槽(这个在以渲染函数返回时会有作用)
- emit:当我们组件内部需要发出事件时会用到 emit(因为我们不能访问 this,所以不可以通过 this.$emit 发出事件)
返回值
setup 既然是一个函数,那么它也可以有返回值,它的返回值用来做什么呢?
- setup 的返回值可以在模板 template 中被使用
- 也就是说我们可以通过 setup 的返回值来替代 data 选项
甚至是我们可以返回一个执行函数来代替在 methods 中定义的方法
1
2
3
4
5
6
7
8
9
10
11
12
13
14
15
16
17
18
19
20
21
22
23
24<template>
<div>{{ count }}</div>
<button @click="increment">+1</button>
<button @click="decrement">-1</button>
</template>
<script>
export default {
setup() {
// 默认定义的数据都不是响应式数据
let count = 0;
const increment = () => {
count++;
console.log(count);
};
const decrement = () => {
count--;
console.log(count);
};
return { count, increment, decrement };
},
};
</script>但是,如果我们将 count 在 increment 或者 decrement 进行操作时,是否可以实现界面的响应式呢
- 答案是不可以
- 这是因为对于一个定义的变量来说,默认情况下,Vue 并不会跟踪它的变化,来引起界面的响应式操作
Reactive
如果想在 setup 中定义的数据提供响应式的特性,那么我们可以使用 reactive 的函数
1
2
3
4
5
6
7
8
9
10
11
12
13
14
15
16
17<template>
<div>{{ info }} - {{ address }}</div>
</template>
<script>
import { reactive } from "vue";
export default {
setup() {
// 定义复杂类型的数据
const info = reactive({ name: "张三", age: 20 });
const address = reactive("北京市"); // value cannot be made reactive: 北京市
return { info, address };
},
};
</script>那么这是什么原因呢?为什么就可以变成响应式的呢?
- 这是因为当我们使用 reactive 函数处理我们的数据之后,数据再次被使用时就会进行依赖收集
- 当数据发生改变时,所有收集到的依赖都是进行对应的响应式操作(比如更新界面)
- 事实上,我们编写的data 选项,也是在内部交给了 reactive 函数将其变成响应式对象的
Ref
reactive API 对传入的类型是有限制的,它要求我们必须传入的是一个对象或者数组类型
- 如果我们传入一个基本数据类型(String、Number、Boolean)会报一个警告
这个时候 Vue3 给我们提供了另外一个 API:ref API
- ref 会返回一个可变的响应式对象,该对象作为一个 响应式的引用 维护着它内部的值,这就是ref 名称的来源
- 它内部的值是在 ref 的 value 属性中被维护的
这里有两个注意事项
在模板中引入 ref 的值时,Vue 会自动帮助我们进行解包操作,所以我们并不需要在模板中通过 ref.value 的方式来使用
但是在 setup 函数内部,它依然是一个 ref 引用, 所以对其进行操作时,我们依然需要使用 ref.value 的方式
1
2
3
4
5
6
7
8
9
10
11
12
13
14
15
16
17
18
19
20
21
22
23
24<template>
<div>{{ count }}</div>
<button @click="increment">+1</button>
<button @click="decrement">-1</button>
</template>
<script>
import { ref } from "vue";
export default {
setup() {
// 强调: ref也可以定义复杂类型的数据
let count = ref(0);
const increment = () => {
count.value++;
};
const decrement = () => {
count.value--;
};
return { count, increment, decrement };
},
};
</script>
自动解包
模板中的解包是浅层的解包,如果我们的代码是下面的方式
1
2
3
4
5
6
7
8
9
10
11
12
13
14
15
16
17
18
19
20
21
22
23
24
25<template>
<div>
<!-- 默认情况下在 template 中使用 ref 时, vue 会自动对其进行解包(取出其中value) -->
<h2>{{ message }}</h2>
<h2>{{ info.message.value }}</h2>
<button @click="changeMessage">changeMessage</button>
</div>
</template>
<script>
import { ref } from "vue";
export default {
setup() {
const message = ref("Hello World");
const changeMessage = () => {
message.value = "Hello Vue.js";
};
const info = { message };
return { message, changeMessage, info };
},
};
</script>如果我们将 ref 放到一个 reactive 的属性当中,那么在模板中使用时,它会自动解包
1
2
3
4
5
6
7
8
9
10
11
12
13
14
15
16
17
18
19
20
21
22
23
24
25<template>
<div>
<!-- 默认情况下在 template 中使用 ref 时, vue 会自动对其进行解包(取出其中value) -->
<h2>{{ message }}</h2>
<h2>{{ info.message }}</h2>
<button @click="changeMessage">changeMessage</button>
</div>
</template>
<script>
import { ref, reactive } from "vue";
export default {
setup() {
const message = ref("Hello World");
const changeMessage = () => {
message.value = "Hello Vue.js";
};
const info = reactive({ message });
return { message, changeMessage, info };
},
};
</script>
readonly
我们通过reactive 或者 ref 可以获取到一个响应式的对象,但是某些情况下,我们传入给其他地方(组件)的这个响应式对象希望在另外一个地方(组件)被使用,但是不能被修改,这个时候如何防止这种情况的出现呢?
- Vue3 为我们提供了readonly 的方法
- readonly 会返回原始对象的只读代理(也就是它依然是一个 Proxy,这是一个proxy 的 set 方法被劫持,并且不能对其进行修改)
在开发中常见的 readonly 方法会传入三个类型的参数
- 类型一:普通对象
- 类型二:reactive 返回的对象
- 类型三:ref 的对象
基本使用
在 readonly 的使用过程中,有如下规则
- readonly返回的对象都是不允许修改的
- 但是经过 readonly 处理的原来的对象是允许被修改的
- 比如 const info = readonly(origin),info 对象是不允许被修改的
- 当origin 被修改时,readonly 返回的 info 对象也会被修改
- 但是我们不能去修改 readonly 返回的对象 info
其实本质上就是 readonly 返回的对象的 setter 方法被劫持了而已
1
2
3
4
5
6
7
8
9
10
11
12
13
14
15
16
17
18
19
20
21
22
23
24
25
26
27
28<template>
<div>
<h2>{{ origin.name }} - {{ origin.age }}</h2>
<h2>{{ info.name }} - {{ info.age }}</h2>
<button @click="changeOrigin">changeOrigin</button>
<button @click="changeInfo">changeInfo</button>
</div>
</template>
<script>
import { ref, readonly } from "vue";
export default {
setup() {
const origin = ref({ name: "张三", age: 18 });
const info = readonly(origin);
const changeOrigin = () => {
origin.value.name = "changeOrigin - 李四";
};
const changeInfo = () => {
info.value.name = "changeInfo - 王五";
};
return { origin, info, changeOrigin, changeInfo };
},
};
</script>那么这个 readonly 有什么用呢?
- 在我们传递给其他组件数据时,往往希望其他组件使用我们传递的内容,但是不允许它们修改时,就可以使用 readonly 了
Reactive 其他的 API
isProxy
- 检查对象是否是由 reactive 或 readonly 创建的 proxy
isReactive
- 检查对象是否是由 reactive 创建的响应式代理
- 如果该代理是 readonly 建的,但包裹了由 reactive 创建的另一个代理,它也会返回 true
isReadonly
- 检查对象是否是由 readonly 创建的只读代理
toRaw
- 返回 reactive 或 readonly 代理的原始对象(不建议保留对原始对象的持久引用。请谨慎使用)
shallowReactive
- 创建一个响应式代理,它跟踪其自身 property 的响应性,但不执行嵌套对象的深层响应式转换 (深层还是原生对象)
- 自身属性发生修改时会更新页面,而嵌套的对象属性发生改变不会更新页面
1
2
3
4
5
6
7
8
9
10
11
12
13
14
15
16
17
18
19
20
21
22
23
24
25
26<template>
<div>
<div>{{ info }}</div>
<button @click="changeSelfAttribute">修改 info 自身属性</button>
<button @click="changeHobbyAttribute">修改 hobby 属性</button>
</div>
</template>
<script>
import { shallowReactive } from "vue";
export default {
setup() {
const info = shallowReactive({ count: 0, hobby: { play: "玩LOL" } });
const changeSelfAttribute = function () {
info.count++;
};
const changeHobbyAttribute = function () {
info.hobby.play = "玩把快乐风男";
};
return { info, changeSelfAttribute, changeHobbyAttribute };
},
};
</script>shallowReadonly
- 创建一个 proxy,使其自身的 property 为只读,但不执行嵌套对象的深度只读转换(深层还是可读、可写的)
- 自身属性和嵌套的对象属性都不会更新页面
1
2
3
4
5
6
7
8
9
10
11
12
13
14
15
16
17
18
19
20
21
22
23
24
25
26<template>
<div>
<div>{{ info }}</div>
<button @click="changeSelfAttribute">修改 info 自身属性</button>
<button @click="changeHobbyAttribute">修改 hobby 属性</button>
</div>
</template>
<script>
import { shallowReadonly } from "vue";
export default {
setup() {
const info = shallowReadonly({ count: 0, hobby: { play: "玩LOL" } });
const changeSelfAttribute = function () {
info.count++;
};
const changeHobbyAttribute = function () {
info.hobby.play = "玩把快乐风男";
};
return { info, changeSelfAttribute, changeHobbyAttribute };
},
};
</script>
toRefs
如果我们使用ES6 的解构语法,对reactive 返回的对象进行解构获取值,那么之后无论是修改结构后的变量,还是修改 reactive 返回的 state 对象,数据都不再是响应式的
那么有没有办法让我们解构出来的属性是响应式的呢?
- Vue 为我们提供了一个toRefs 的函数,可以将reactive 返回的对象中的属性都转成 ref
- 那么我们再次进行结构出来的 name 和 age 本身都是 ref 的
这种做法相当于已经在state.name 和 ref.value之间建立了 链接,任何一个修改都会引起另外一个变化
1
2
3
4
5
6
7
8
9
10
11
12
13
14
15
16
17
18
19
20
21
22
23
24
25
26
27
28<template>
<div>{{ name }} - {{ age }}</div>
<button @click="changeName">changeName</button>
<button @click="changeAge">changeAge</button>
</template>
<script>
import { reactive, toRefs } from "vue";
export default {
setup() {
const state = reactive({ name: "strive", age: 18 });
// let { name, age } = state; // 不是响应式的
const { name, age } = toRefs(state);
const changeName = () => {
// name = "张三";
name.value = "张三";
};
const changeAge = () => {
// age++;
age.value++;
};
return { name, age, changeName, changeAge };
},
};
</script>
toRef
如果我们只希望转换一个reactive 对象中的属性为 ref,那么可以使用 toRef 的方法
1
2
3
4
5
6
7
8
9
10
11
12
13
14
15
16
17
18
19
20
21
22
23
24
25
26
27<template>
<div>{{ name }} - {{ age }}</div>
<button @click="changeName">changeName</button>
<button @click="changeAge">changeAge</button>
</template>
<script>
import { reactive, toRef } from "vue";
export default {
setup() {
const state = reactive({ name: "strive", age: 18 });
const name = toRef(state, "name");
let { age } = state;
const changeName = () => {
name.value = "张三";
};
const changeAge = () => {
age++;
console.log(age);
};
return { name, age, changeName, changeAge };
},
};
</script>
Ref 其他的 API
unref
- 如果我们想要获取一个 ref 引用中的 value,那么也可以通过 unref 方法
- 如果参数是一个 ref,则返回内部值,否则返回参数本身
- 这是 val = isRef(val) ? val.value : val 的语法糖函数
- 如果我们想要获取一个 ref 引用中的 value,那么也可以通过 unref 方法
isRef
- 判断值是否是一个 ref 对象
shallowRef
- 创建一个浅层的 ref 对象
triggerRef
- 手动触发和 shallowRef 相关联的副作用
1
2
3
4
5
6
7
8
9
10
11
12
13
14
15
16
17
18
19
20
21<template>
<div>{{ info.count }}</div>
<button @click="changeCount">changeCount</button>
</template>
<script>
import { shallowRef, triggerRef } from "vue";
export default {
setup() {
let info = shallowRef({ count: 0 });
const changeCount = () => {
info.value.count++;
triggerRef(info);
};
return { info, changeCount };
},
};
</script>
setup 不可以使用 this
官方关于 this 有这样一段描述
- 表达的含义是 this 并没有指向当前组件实例
- 并且在 setup 被调用之前,data、computed、methods 等都没有被解析
- 所以无法在 setup 中获取 this
在 setup 中你应该避免使用 this ,因为它不会找到组件实例。 setup 的调用发生在 data、computed 或 methods 被解析之前,所以它们无法在 setup 中被获取
其实在之前的这段描述是和源码有出入的
- 之前的描述大概含义是不可以使用 this 是因为组件实例还没有被创建出来
在阅读源码的过程中,代码是按照如下顺序执行的
- 调用 createComponentInstance 创建组件实例
- 调用 setupComponent 初始化 component 内部的操作
- 调用 setupStatefulComponent 初始化有状态的组件
- 在 setupStatefulComponent 取出了 setup 函数
- 通过 callWithErrorHandling 的函数执行 setup
从上面的代码我们可以看出, 组件的 instance 肯定是在执行 setup 函数之前就创建出来的
1
2
3
4
5
6
7
8
9
10
11
12
13
14
15// core/packages/runtime-core/src/errorHandling.ts
export function callWithErrorHandling(
fn: Function,
instance: ComponentInternalInstance | null,
type: ErrorTypes,
args?: unknown[]
) {
let res;
try {
res = args ? fn(...args) : fn(); // fn === setup
} catch (err) {
handleError(err, instance, type);
}
return res;
}
computed
在前面我们讲解过计算属性 computed:当我们的某些属性是依赖其他状态时,我们可以使用计算属性来处理
- 在前面的 Options API 中,我们是使用 computed 选项来完成的
- 在 Composition API 中,我们可以在 setup 函数中使用 computed 方法来编写一个计算属性
如何使用 computed 呢
- 方式一:接收一个 getter 函数,并为 getter 函数返回的值,返回一个不变的 ref 对象
- 方式二:接收一个具有 get 和 set 的对象,返回一个可变的(可读写)ref 对象
1
2
3
4
5
6
7
8
9
10
11
12
13
14
15
16
17
18
19
20
21
22
23
24
25
26
27
28
29
30
31
32
33
34<template>
<h2>{{ fullName }}</h2>
<button @click="setFullname">setFullname</button>
</template>
<script>
import { reactive, computed } from "vue";
export default {
setup() {
const names = reactive({ firstName: "李", lastName: "四" });
// get 写法
// const fullName = computed(() => names.firstName + "-" + names.lastName);
// 完整的写法
const fullName = computed({
get: () => names.firstName + "-" + names.lastName,
set(value) {
const newNames = value.split("-");
names.firstName = newNames[0];
names.lastName = newNames[1];
},
});
function setFullname() {
fullName.value = "张-三峰";
}
return { names, fullName, setFullname };
},
};
</script>
setup 中使用 ref
在 setup 中如何使用 ref 获取元素或者组件?
- 其实非常简单,我们只需要定义一个 ref 对象,绑定到元素或者组件的 ref 属性上即可
1
2
3
4
5
6
7
8
9
10
11
12
13
14
15
16
17
18
19
20
21
22
23
24
25
26
27
28
29
30
31
32
33
34
35<template>
<!-- 1.获取元素 -->
<h2 ref="titleRef">标题</h2>
<button ref="btnRef">按钮</button>
<!-- 2.获取组件实例 -->
<show-info ref="showInfoRef"></show-info>
<button @click="getElements">获取元素</button>
</template>
<script>
import { ref } from "vue";
import ShowInfo from "./ShowInfo.vue";
export default {
components: { ShowInfo },
setup() {
const titleRef = ref();
const btnRef = ref();
const showInfoRef = ref();
function getElements() {
console.log(titleRef.value);
console.log(btnRef.value);
console.log(showInfoRef.value);
showInfoRef.value.showInfoFoo();
}
return { titleRef, btnRef, showInfoRef, getElements };
},
};
</script>1
2
3
4
5
6
7
8
9
10
11
12
13
14
15<template>
<div>ShowInfo</div>
</template>
<script>
export default {
setup() {
function showInfoFoo() {
console.log("showInfo foo function");
}
return { showInfoFoo };
},
};
</script>
生命周期钩子
我们前面说过 setup 可以用来替代 data 、 methods 、 computed 等等这些选项,也可以替代 生命周期钩子
那么 setup 中如何使用生命周期函数呢?
- 可以使用直接导入的 onX 函数注册生命周期钩子
因为 setup 是围绕 beforeCreate 和 created 生命周期钩子运行的,所以不需要显式地定义它们。换句话说,在这些钩子中编写的任何代码都应该直接在 setup 函数中编写
1
2
3
4
5
6
7
8
9
10
11beforeCreate -> setup()
created -> setup()
beforeMount -> onBeforeMount
mounted -> onMounted
beforeUpdate -> onBeforeUpdate
updated -> onUpdated
beforeDestroy -> onBeforeUnmount
destroyed -> onUnmounted
activated -> onActivated
deactivated -> onDeactivated
errorCaptured -> onErrorCaptured
Provide 函数
事实上我们之前还学习过 Provide 和 Inject,Composition API 也可以替代之前的 Provide 和 Inject 的选项
我们可以通过 provide 来提供数据
- 可以通过 provide 方法来定义每个 Property
provide 可以传入两个参数
- name:提供的属性名称
- value:提供的属性值
1
2
3
4
5
6
7setup() {
let counter = 100;
let info = { name: "strive", age: 18 };
provide("counter", counter);
provide("info", info);
}
Inject 函数
在 后代组件 中可以通过 inject 来注入需要的属性和对应的值
- 可以通过 inject 来注入需要的内容
inject 可以传入两个参数
- 要 inject 的 property 的 name
- 默认值
1
2
3
4
5
6
7
8
9// inject 的 options api 注入, 那么依然需要手动来解包
// inject: ["counter", "info"],
setup() {
const counter = inject("counter");
const info = inject("info");
const height = inject("height", 1.83);
return { counter, info };
}
侦听数据的变化
- 在前面的 Options API 中,我们可以通过watch 选项来侦听data 或者 props的数据变化,当数据变化时执行某一些操作
- 在 Composition API 中,我们可以使用watchEffect 和 watch来完成响应式数据的侦听
- watchEffect:用于自动收集响应式数据的依赖
- watch:需要手动指定侦听的数据源
watch 的使用
watch 的 API 完全等同于组件 watch 选项的 Property
- watch 需要侦听特定的数据源,并且执行其回调函数
- 默认情况下它是惰性的,只有当被侦听的源发生变化时才会执行回调
1
2
3
4
5
6
7
8
9
10
11
12
13
14
15
16
17
18
19
20
21
22
23
24
25
26
27
28
29
30
31
32
33
34
35
36
37
38
39
40
41
42
43
44
45
46
47
48
49
50<template>
<h1>{{ count }}</h1>
<button @click="count++">+1</button>
<button @click="count--">-1</button>
<hr />
<h1>{{ name }} - {{ age }}</h1>
<button @click="name = '张三'">setName</button>
<button @click="age = 28">setAge</button>
<hr />
<h1>{{ info }}</h1>
<button @click="info.friend.name = 'i coder'">setInfo</button>
</template>
<script>
import { ref, reactive, watch } from "vue";
export default {
setup() {
let count = ref(0);
let name = ref("strive");
let age = ref(18);
let info = reactive({ name: "lwh", friend: { name: "coder" } });
// 监听单个属性变化
watch(count, (newValue, oldValue) => {
console.log(newValue, oldValue);
});
// 监听多个属性变化
watch([name, age], (newValue, oldValue) => {
console.log(newValue, oldValue);
});
// 选项配置
watch(
info,
(newValue, oldValue) => {
console.log(newValue, oldValue);
},
{ immediate: true, deep: true }
);
return { count, name, age, info };
},
};
</script>
watchEffect
当侦听到某些响应式数据变化时,我们希望执行某些操作,这个时候可以使用 watchEffect
- 首先,watchEffect 传入的函数会被立即执行一次,并且在执行的过程中会收集依赖
- 其次,只有收集的依赖发生变化时,watchEffect 传入的函数才会再次执行
如果在发生某些情况下,我们希望停止侦听,这个时候我们可以获取 watchEffect 的返回值函数,调用该函数即可
1
2
3
4
5
6
7
8
9
10
11
12
13
14
15
16
17
18
19
20
21
22
23
24<template>
<h1>{{ count }}</h1>
<button @click="count++">+1</button>
<button @click="count--">-1</button>
</template>
<script>
import { ref, watchEffect } from "vue";
export default {
setup() {
let count = ref(0);
let stopWatch = watchEffect(() => {
console.log(count.value);
if (count.value >= 6) {
stopWatch();
}
});
return { count };
},
};
</script>
script setup 语法
script setup 是在单文件组件 (SFC) 中使用组合式 API 的编译时语法糖,当同时使用 SFC 与组合式 API 时则推荐该语法
- 更少的样板内容,更简洁的代码
- 能够使用纯 Typescript 声明 prop 和抛出事件
- 更好的运行时性能
- 更好的 IDE 类型推断性能
使用这个语法,需要将 setup attribute 添加到 script 代码块上
1
<script setup></script>
里面的代码会被编译成组件 setup() 函数的内容
- 这意味着与普通的 script 只在组件被首次引入的时候执行一次不同
- script setup 中的代码会在每次组件实例被创建的时候执行
顶层的绑定会被暴露给模板
当使用 script setup 的时候,任何在 script setup 声明的顶层的绑定 (包括变量,函数声明,以及 import 引入的内容) 都能在模板中直接使用
响应式数据需要通过 ref、reactive 来创建
1
2
3
4
5
6
7
8
9
10
11
12
13<template>
<h1>{{ message }}</h1>
<button @click="changeMessage">changeMessage</button>
</template>
<script setup>
import { ref } from "vue";
const message = ref("Hello,World");
function changeMessage() {
message.value = "Hello,Vue.js";
}
</script>
defineProps 和 defineEmits
为了在声明 props 和 emits 选项时获得完整的类型推断支持,我们可以使用 defineProps 和 defineEmits API,它们将自动地在 script setup 中可用
1
2
3
4
5
6
7
8
9
10
11
12
13
14
15
16
17
18
19
20
21
22<template>
<h1>App: {{ message }}</h1>
<button @click="changeMessage">changeMessage</button>
<show-info name="strive" :age="18" @info-btn-click="infoBtnClick" />
</template>
<script setup>
import { ref } from "vue";
// 导入的组件直接使用
import ShowInfo from "./ShowInfo.vue";
const message = ref("Hello,World");
function changeMessage() {
message.value = "Hello,Vue.js";
}
function infoBtnClick(payload) {
console.log("监听到ShowInfo内部的点击:", payload);
}
</script>1
2
3
4
5
6
7
8
9
10
11
12
13
14
15
16<template>
<h1>ShowInfo: {{ name }} - {{ age }}</h1>
<button @click="showInfoBtnClick">showInfoBtnClick</button>
</template>
<script setup>
const props = defineProps({
name: { type: String, default: "默认值" },
age: { type: Number, default: 0 },
});
const emits = defineEmits(["infoBtnClick"]);
function showInfoBtnClick() {
emits("infoBtnClick", "ShowInfo内部发生了点击");
}
</script>
defineExpose
使用 script setup 的组件是默认关闭的
- 通过模板 ref 或者 $parent 链获取到的组件的公开实例,不会暴露任何在 script setup 中声明的绑定
通过 defineExpose 编译器宏来显式指定在 script setup 组件中要暴露出去的 property
1
2
3
4
5
6
7
8
9
10
11
12
13
14
15
16
17<template>
<h2>App</h2>
<button @click="getShowInfoFoo">getShowInfoFoo</button>
<ShowInfo ref="showInfoRef" />
</template>
<script setup>
import { ref } from "vue";
import ShowInfo from "./ShowInfo.vue";
const showInfoRef = ref(null);
function getShowInfoFoo() {
showInfoRef.value.foo();
}
</script>1
2
3
4
5
6
7
8
9
10
11
12<template>
<div>
<h2>ShowInfo</h2>
</div>
</template>
<script setup>
function foo() {
console.log("foo function");
}
defineExpose({ foo });
</script>
Router
认识前端路由
- 路由其实是网络工程中的一个术语
- 在架构一个网络时,非常重要的两个设备就是路由器和交换机
- 当然,目前在我们生活中路由器也是越来越被大家所熟知,因为我们生活中都会用到路由器
- 事实上,路由器主要维护的是一个映射表
- 映射表会决定数据的流向
- 路由的概念在软件工程中出现,最早是在后端路由中实现的,原因是 web 的发展主要经历了这样一些阶段
- 后端路由阶段
- 前后端分离阶段
- 单页面富应用(SPA)
后端路由阶段
- 早期的网站开发整个 HTML 页面是由服务器来渲染的
- 服务器直接生产渲染好对应的 HTML 页面,返回给客户端进行展示
- 但是,一个网站, 这么多页面服务器如何处理呢
- 一个页面有自己对应的网址,也就是URL
- URL 会发送到服务器,服务器会通过正则对该 URL 进行匹配,并且最后交给一个 Controller 进行处理
- Controller 进行各种处理,最终生成HTML 或者数据,返回给前端
- 上面的这种操作, 就是后端路由
- 当我们页面中需要请求不同的路径内容时,交给服务器来进行处理,服务器渲染好整个页面,并且将页面返回给客户端
- 这种情况下渲染好的页面,不需要单独加载任何的 js 和 css,可以直接交给浏览器展示,这样也有利于 SEO 的优化
- 后端路由的缺点
- 一种情况是整个页面的模块由后端人员来编写和维护的
- 另一种情况是前端开发人员如果要开发页面,需要通过 PHP 和 Java 等语言来编写页面代码
- 而且通常情况下HTML 代码和数据以及对应的逻辑会混在一起,编写和维护都是非常糟糕的事情
前后端分离阶段
- 前端渲染的理解
- 每次请求涉及到的静态资源都会从静态资源服务器获取,这些资源包括 HTML+CSS+JS,然后在前端对这些请求回来的资源进行渲染
- 需要注意的是,客户端的每一次请求,都会从静态资源服务器请求文件
- 同时可以看到,和之前的后端路由不同,这时后端只是负责提供 API了
- 前后端分离阶段
- 随着 Ajax 的出现,有了前后端分离的开发模式
- 后端只提供 API 来返回数据,前端通过 Ajax 获取数据,并且可以通过 JavaScript 将数据渲染到页面中
- 这样做最大的优点就是前后端责任的清晰,后端专注于数据上,前端专注于交互和可视化上
- 并且当移动端(iOS/Android)出现后,后端不需要进行任何处理,依然使用之前的一套 API 即可
- 目前比较少的网站采用这种模式开发
- 单页面富应用阶段
- 其实 SPA 最主要的特点就是在前后端分离的基础上加了一层前端路由
- 也就是前端来维护一套路由规则
- 前端路由的核心是什么呢?改变 URL,但是页面不进行整体的刷新
Hash
前端路由是如何做到 URL 和内容进行映射呢?监听 URL 的改变
URL 的 hash
- URL 的 hash 也就是锚点(#),本质上是改变 window.location 的 href 属性
- 我们可以通过直接赋值 location.hash 来改变 href,但是页面不发生刷新
1
2
3
4
5
6
7
8
9
10
11
12
13
14
15
16
17
18
19
20
21
22<a href="#/home">home</a>
<a href="#/about">about</a>
<div class="router-view"></div>
<script>
const routerViewEl = document.querySelector(".router-view");
window.addEventListener("hashchange", () => {
switch (location.hash) {
case "#/home":
routerViewEl.innerHTML = "home";
break;
case "#/about":
routerViewEl.innerHTML = "about";
break;
default:
routerViewEl.innerHTML = "default";
}
});
</script>hash 的优势就是兼容性更好,在老版 IE 中都可以运行,但是缺陷是有一个#,显得不像一个真实的路径
History
history 模式是 HTML5 新增的,它有六种模式改变 URL 而不刷新页面
replaceState:替换原来的路径
pushState:使用新的路径
popState:路径的回退
go:向前或向后改变路径
forward:向前改变路径
back:向后改变路径
1
2
3
4
5
6
7
8
9
10
11
12
13
14
15
16
17
18
19
20
21
22
23
24
25
26
27
28
29
30
31
32
33
34
35
36
37
38<!--需要开启本地服务-->
<button class="home">home</button>
<button class="about">about</button>
<div class="router-view"></div>
<script>
const homeEl = document.querySelector(".home");
const aboutEl = document.querySelector(".about");
const routerViewEl = document.querySelector(".router-view");
homeEl.onclick = function () {
history.pushState({}, "", "/home");
historyChange();
};
aboutEl.onclick = function () {
history.pushState({}, "", "/about");
historyChange();
};
// 监听浏览器前进后退
window.addEventListener("popstate", historyChange);
function historyChange() {
switch (location.pathname) {
case "/home":
routerViewEl.innerHTML = "home";
break;
case "/about":
routerViewEl.innerHTML = "about";
break;
default:
routerViewEl.innerHTML = "default";
}
}
</script>
vue-router
目前前端流行的三大框架,都有自己的路由实现
- Angular:ngRouter
- React:ReactRouter
- Vue:vue-router
Vue Router 是 Vue.js 的官方路由
- 它与 Vue.js 核心深度集成,让用 Vue.js 构建单页应用(SPA)变得非常容易
vue-router 是基于路由和组件的
- 路由用于设定访问路径,将路径和组件映射起来
- 在 vue-router 的单页面应用中,页面的路径的改变就是组件的切换
安装 Vue Router
1
npm install vue-router
使用步骤
第一步:创建路由需要映射的组件
第二步:通过 createRouter 创建路由对象,并且传入 routes 和 history 模式
- 配置路由映射:组件和路径映射关系的 routes 数组
- 创建基于 hash 或者 history 的模式
1
2
3
4
5
6
7
8
9
10
11
12
13
14
15
16
17
18
19
20
21
22import {
createRouter,
createWebHashHistory,
createWebHistory,
} from "vue-router";
import Home from "../Views/Home.vue";
import About from "../Views/About.vue";
// 创建一个路由: 映射关系
const router = createRouter({
// 指定采用的模式: hash
history: createWebHashHistory(),
// history: createWebHistory(),
// 映射关系
routes: [
{ path: "/home", component: Home },
{ path: "/about", component: About },
],
});
export default router;第三步:使用 app 注册路由对象(use 方法)
1
2
3
4
5
6
7
8import { createApp } from "vue";
import router from "./router";
import App from "./App.vue";
const app = createApp(App);
app.use(router);
app.mount("#app");第四步:路由使用: 通过 router-link 和 router-view
1
2
3
4
5
6
7
8
9
10
11
12
13
14
15
16
17
18<template>
<div class="app">
<h2>App Content</h2>
<div class="nav">
<router-link to="/home">Home</router-link>
<router-link to="/about">About</router-link>
</div>
<router-view></router-view>
</div>
</template>
<style>
.nav a {
margin-right: 10px;
}
</style>
默认路径
我们这里还有一个不太好的实现
- 默认情况下,进入网站的首页, 我们希望 router-view 渲染首页的内容
- 但是我们的实现中,默认没有显示首页组件, 必须让用户点击才可以
如何可以让路径默认跳到到首页,并且 router-view 渲染首页组件呢
1
{ path: "/", redirect: "/home" },
我们在 routes 中又配置了一个映射
- path 配置的是根路径(/)
- redirect 是重定向,也就是我们将根路径重定向到/home 的路径下,这样就可以得到我们想要的结果了
router-link
- router-link 事实上有很多属性可以配置
- to:是一个字符串,或者是一个对象
- replace:设置 replace 属性的话,当点击时,会调用 router.replace(),而不是 router.push()
- active-class:设置激活 a 元素后应用的 class,默认是 router-link-active
- exact-active-class:链接精准激活时,应用于渲染的 a 元素的 class,默认是 router-link-exact-active
懒加载
当打包构建应用时,JavaScript 包会变得非常大,影响页面加载
- 如果我们能把不同路由对应的组件分割成不同的代码块,然后当路由被访问的时候才加载对应组件,这样就会更加高效
- 也可以提高首屏的渲染效率
其实这里还是我们前面讲到过的 webpack 的分包知识,而 Vue Router 默认就支持动态来导入组件
- 这是因为 component 可以传入一个组件,也可以接收一个函数,该函数 需要放回一个 Promise
- 而 import 函数就是返回一个 Promise
1
2
3
4
5
6
7
8
9
10
11
12
13
14
15// 路由的懒加载
// 对分包进行命名(chunk name)
// const Home = () => import(/* webpackChunkName: 'home' */"../Views/Home.vue");
// const Home = () => import("../Views/Home.vue");
// const About = () => import("../Views/About.vue");
const router = createRouter({
history: createWebHashHistory(),
routes: [
{ path: "/", redirect: "/home" },
{ path: "/home", component: () => import("../Views/Home.vue") },
{ path: "/about", component: () => import("../Views/About.vue") },
],
});
其他属性
name:路由记录独一无二的名称
meta:自定义的数据
1
2
3
4
5
6{
path: "/about",
name: "about-name",
meta: { name: "strive", age: 20, game: "lol" },
component: () => import("../Views/About.vue"),
}
动态路由基本匹配
很多时候我们需要将给定匹配模式的路由映射到同一个组件
- 例如,我们可能有一个 User 组件,它应该对所有用户进行渲染,但是用户的 ID 是不同的
- 在 Vue Router 中,我们可以在路径中使用一个动态字段来实现,我们称之为 路径参数
1
2
3
4{ path: "/user/:id", component: () => import("../Views/User.vue") },
// <router-link to="/user/001">用户001</router-link>
// <router-link to="/user/002">用户002</router-link>
获取动态路由的值
那么在 User 中如何获取到对应的值呢
- 在 created 中,通过 this.$route.params 获取值
- 在 template 中,直接通过 $route.params 获取值
- 在 setup 中,我们要使用 vue-router 库给我们提供的一个 hook useRoute
- 该 hook 会返回一个 Route 对象,对象中保存着当前路由相关的值
1
2
3
4
5
6
7
8
9
10
11
12
13
14
15
16
17
18<template>
<h1>User - {{ $route.params.id }}</h1>
</template>
<script>
import { useRoute } from "vue-router";
export default {
created() {
console.log(this.$route.params.id);
},
setup() {
const route = useRoute();
console.log(route.params.id);
},
};
</script>
NotFound
对于哪些没有匹配到的路由,我们通常会匹配到固定的某个页面
- 比如 NotFound 的错误页面中,这个时候我们可编写一个动态路由用于匹配所有的页面
1
{ path: "/:pathMatch(.*)", component: () => import("../Views/NotFound.vue") },
我们可以通过 $route.params.pathMatch 获取到传入的参数
1
2
3
4
5
6
7
8
9
10
11
12
13
14<template>
<div class="not-found">
<h2>
NotFound: 您当前的路径{{ $route.params.pathMatch }}不正确,
请输入正确的路径!
</h2>
</div>
</template>
<style scoped>
.not-found {
color: red;
}
</style>
匹配规则加*
这里还有另外一种写法
- 注意:我在 /:pathMatch(._) 后面又加了一个 _
1
{ path: "/:pathMatch(.*)*", component: () => import("../Views/NotFound.vue") }
它们的区别在于解析的时候,是否解析 /
- NotFound:您当前的路径 哈哈哈/呵呵呵/嘿嘿嘿 不正确, 请输入正确的路径!
- NotFound:您当前的路径 [ “哈哈哈”, “呵呵呵”, “嘿嘿嘿” ] 不正确, 请输入正确的路径!
嵌套
什么是路由的嵌套呢?
- 目前我们匹配的 Home、About、User 等都属于第一层路由,我们在它们之间可以来回进行切换
但是呢,我们 Home 页面本身,也可能会在多个组件之间来回切换
- 比如 Home 中包括 Product、Message 它们可以在 Home 内部来回切换
- 这个时候我们就需要使用嵌套路由,在 Home 中也使用 router-view 来占位之后需要渲染的组件
1
2
3
4
5
6
7
8
9{
path: "/home",
component: () => import("../Views/Home.vue"),
children: [
{ path: "/home", redirect: "/home/product" },
{ path: "product", component: () => import("../Views/Product.vue") },
{ path: "message", component: () => import("../Views/Message.vue") },
],
},1
2
3
4
5
6
7
8
9
10
11
12
13
14
15
16
17
18
19
20
21
22
23
24
25
26
27
28
29
30
31
32
33
34<template>
<h2>Home</h2>
<div class="nav">
<router-link to="/home/product">Product</router-link>
<router-link to="/home/message">Message</router-link>
</div>
<div>
<button @click="ProductClick">Product</button>
<button @click="MessageClick">Message</button>
</div>
<router-view></router-view>
</template>
<script setup>
import { useRouter } from "vue-router";
const router = useRouter();
function ProductClick() {
// router.back()
// router.forward()
// router.go(1) -> forward()
// router.go(-1) -> back()
router.push("/home/product");
}
function MessageClick() {
router.push({ path: "/home/message", query: { name: "张三", age: 18 } });
}
</script>1
2
3
4
5<template>
<div>
<h2>Message: {{ $route.query }}</h2>
</div>
</template>
动态添加路由
某些情况下我们可能需要动态的来添加路由
- 比如根据用户不同的权限,注册不同的路由
- 这个时候我们可以使用一个方法 addRoute
如果我们是为 route 添加一个 children 路由,那么可以传入对应的 name
1
2
3
4
5
6
7
8
9
10
11
12
13
14
15// 动态管理路由
let isAdmin = true;
if (isAdmin) {
// 动态添加一级路由
router.addRoute({
path: "/admin",
component: () => import("../Views/Admin.vue"),
});
// 动态添加二级路由
router.addRoute("about-name", {
path: "vip",
component: import("../Views/Vip.vue"),
});
}
动态管理路由的其他方法
删除路由有以下三种方式
- 方式一:添加一个 name 相同的路由
1
2
3
4
5
6
7
8
9
10
11router.addRoute({
path: "/about",
name: "about"
component: () => import("../Views/About.vue"),
});
router.addRoute({
path: "/other",
name: "about"
component: () => import("../Views/Other.vue"),
});- 方式二:通过 removeRoute 方法,传入路由的名称
1
2
3
4
5
6
7router.addRoute({
path: "/about",
name: "about"
component: () => import("../Views/About.vue"),
});
router.removeRoute('about')- 方式三:通过 addRoute 方法的返回值回调
1
2
3
4
5
6
7let removeRoute = router.addRoute({
path: "/about",
name: "about"
component: () => import("../Views/About.vue"),
});
removeRoute()路由的其他方法补充
- router.hasRoute():检查路由是否存在
- router.getRoutes():获取一个包含所有路由记录的数组
1
2console.log(router.hasRoute("home"));
console.log(router.getRoutes());
导航守卫
vue-router 提供的导航守卫主要用来通过跳转或取消的方式守卫导航
全局的前置守卫 beforeEach 是在导航触发时会被回调的
它有两个参数
- to:即将进入的路由 Route 对象
- from:即将离开的路由 Route 对象
它有返回值
false:取消当前导航
不返回或者 undefined:不做任何处理
返回一个路由地址:
- 可以是一个 string 类型的路径
- 可以是一个对象,对象中包含 path、query、params 等信息
可选的第三个参数:next(不推荐使用)
- 在 Vue2 中我们是通过 next 函数来决定如何进行跳转的
- 但是在 Vue3 中我们是通过返回值来控制的,不再推荐使用 next 函数,这是因为开发中很容易调用多次 next
1
2
3
4
5
6
7
8// 进行任何的路由跳转之前, 传入的beforeEach中的函数都会被回调
router.beforeEach((to, from) => {
const token = localStorage.getItem("token");
if (to.path === "/order" && !token) {
// return "/login"
return { path: "/login" };
}
});
其他导航守卫
- Vue-Router 还提供了很多的其他守卫函数,目的都是在某一个时刻给予我们回调,让我们可以更好的控制程序的流程或者功能
- 完整的导航解析流程
- 导航被触发
- 在失活的组件里调用
beforeRouteLeave守卫。 - 调用全局的
beforeEach守卫。 - 在重用的组件里调用
beforeRouteUpdate守卫(2.2+) - 在路由配置里调用
beforeEnter - 解析异步路由组件
- 在被激活的组件里调用
beforeRouteEnter - 调用全局的
beforeResolve守卫(2.5+) - 导航被确认
- 调用全局的
afterEach钩子 - 触发 DOM 更新
- 调用
beforeRouteEnter守卫中传给next的回调函数,创建好的组件实例会作为回调函数的参数传入
Vuex
什么是状态管理
- 在开发中,我们会在应用程序中处理各种各样的数据,这些数据需要保存在我们应用程序中的某一个位置,对于这些数据的管理我们就称之为是 状态管理
- 在前面我们是如何管理自己的状态呢
- 在 Vue 开发中,我们使用组件化的开发方式
- 而在组件中我们定义 data 或者在 setup 中返回使用的数据,这些数据我们称之为state
- 在模板 template中我们可以使用这些数据,模板最终会被渲染成 DOM,我们称之为View
- 在模板中我们会产生一些行为事件,处理这些行为事件时,有可能会修改 state,这些行为事件我们称之为actions
复杂的状态管理
- JavaScript 开发的应用程序,已经变得越来越复杂了
- JavaScript 需要管理的状态越来越多,越来越复杂
- 这些状态包括服务器返回的数据、缓存数据、用户操作产生的数据等等
- 也包括一些UI 的状态,比如某些元素是否被选中,是否显示加载动效,当前分页
- 当我们的应用遇到多个组件共享状态时,单向数据流的简洁性很容易被破坏
- 多个视图依赖于同一状态
- 来自不同视图的行为需要变更同一状态
- 我们是否可以通过组件数据的传递来完成呢?
- 对于一些简单的状态,确实可以通过 props 的传递或者 Provide 的方式来共享状态
- 但是对于复杂的状态管理来说,显然单纯通过传递和共享的方式是不足以解决问题的,比如兄弟组件如何共享数据呢?
Vuex 的状态管理
管理不断变化的 state 本身是非常困难的
- 状态之间相互会存在依赖,一个状态的变化会引起另一个状态的变化,View 页面也有可能会引起状态的变化
- 当应用程序复杂时,state 在什么时候,因为什么原因而发生了变化,发生了怎么样的变化,会变得非常难以控制和追踪
因此,我们是否可以考虑将组件的内部状态抽离出来,以一个全局单例的方式来管理呢
- 在这种模式下,我们的组件树构成了一个巨大的 “试图 View”
- 不管在树的哪个位置,任何组件都能获取状态或者触发行为
- 通过定义和隔离状态管理中的各个概念,并通过强制性的规则来维护视图和状态间的独立性,我们的代码边会变得更加结构化和易于维护、跟踪
这就是 Vuex 背后的基本思想,它借鉴了 Flux、Redux、Elm(纯函数语言,redux 有借鉴它的思想)
安装 Vuex
1
npm install vuex
单一状态树
Vuex 使用单一状态树
- 用一个对象就包含了全部的应用层级的状态
- 采用的是SSOT,Single Source of Truth,也可以翻译成单一数据源
这也意味着,每个应用将仅仅包含一个 store 实例
- 单状态树和模块化并不冲突
单一状态树的优势
- 如果你的状态信息是保存到多个 Store 对象中的,那么之后的管理和维护等等都会变得特别困难
- 所以 Vuex 也使用了单一状态树来管理应用层级的全部状态
- 单一状态树能够让我们最直接的方式找到某个状态的片段
- 而且在之后的维护和调试过程中,也可以非常方便的管理和维护
Store
每一个 Vuex 应用的核心就是 store(仓库)
- store 本质上是一个容器,它包含着你的应用中大部分的状态(state)
Vuex 和单纯的全局对象有什么区别呢
- 第一:Vuex 的状态存储是响应式的
- 当 Vue 组件从 store 中读取状态的时候,若 store 中的状态发生变化,那么相应的组件也会被更新
- 第二:你不能直接改变 store 中的状态
- 改变 store 中的状态的唯一途径就是提交 (commit) mutation
- 这样使得我们可以方便的跟踪每一个状态的变化,从而让我们能够通过一些工具帮助我们更好的管理应用的状态
1
2
3
4
5
6
7
8
9import { createStore } from "vuex";
const store = createStore({
state() {
return { counter: 100, message: "Hello,Vue" };
},
});
export default store;1
2
3
4
5import { createApp } from "vue";
import App from "./App.vue";
import store from "./store";
createApp(App).use(store).mount("#app");- 第一:Vuex 的状态存储是响应式的
基本使用
在模板中使用
1
2
3
4
5<template>
<div>
<h2>{{ $store.state.counter }}</h2>
</div>
</template>在 options api 中使用
1
2
3
4
5
6
7<script>
export default {
created() {
console.log(this.$store.state.counter);
},
};
</script>在 setup 中使用
1
2
3
4
5
6<script setup>
import { useStore } from "vuex";
const store = useStore();
console.log(store.state.counter);
</script>
mapState
如果我们有很多个状态都需要获取的话,可以使用 mapState 的辅助函数
- mapState 的方式一:对象类型
- mapState 的方式一:数组类型
- 也可以使用展开运算符和原来有的 computed混合在一起
1
2
3
4
5
6
7
8
9
10
11
12
13
14
15
16
17
18
19
20
21
22
23
24
25
26
27
28
29
30
31
32
33
34
35
36<template>
<div>
<h2>{{ counter }}</h2>
<h2>{{ rename_message }}</h2>
<hr />
<h2>{{ computed_counter }}</h2>
<h2>{{ toRefsMessage }}</h2>
</div>
</template>
<script>
import { mapState } from "vuex";
export default {
computed: {
...mapState(["counter"]),
...mapState({ rename_message: (state) => state.message }),
},
};
</script>
<script setup>
import { computed, toRefs } from "vue";
import { mapState, useStore } from "vuex";
const store = useStore();
const mapObject = mapState(["counter"]);
const computed_counter = computed(
mapObject.counter.bind({ $store: store })
);
// 直接对 store.state 进行解构(推荐)
const { message: toRefsMessage } = toRefs(store.state);
</script>
Getters
某些属性我们可能需要经过变化后来使用,这个时候可以使用 getters
1
2
3
4
5
6
7
8
9
10
11
12
13
14
15
16
17
18
19
20
21
22
23
24
25import { createStore } from "vuex";
const store = createStore({
state() {
return { counter: 100, message: "Hello,Vue" };
},
getters: {
// 基本使用
doubleCounter(state) {
return state.counter * 2;
},
// 在该getters属性中, 获取其他的getters
message(state, getters) {
return `${state.message} --- ${getters.doubleCounter}`;
},
// getters是可以返回一个函数的, 调用这个函数可以传入参数
printMessage() {
return function (message) {
return `${message}`;
};
},
},
});
export default store;1
2
3
4
5
6
7
8
9<template>
<div>
<h2>{{ $store.getters.doubleCounter }}</h2>
<h2>{{ $store.getters.message }}</h2>
<h2>{{ $store.getters.printMessage("哈哈哈") }}</h2>
</div>
</template>
<script setup></script>
mapGetters
如果我们有很多个属性都需要获取的话,可以使用 mapGetters 的辅助函数
- mapGetters 的方式一:对象类型
- mapGetters 的方式一:数组类型
- 也可以使用展开运算符和原来有的 computed混合在一起
1
2
3
4
5
6
7
8
9
10
11
12
13
14
15
16
17
18
19
20
21
22
23
24
25
26
27
28
29
30
31
32
33
34
35
36
37
38
39
40<template>
<div>
<h2>{{ doubleCounter }}</h2>
<h2>{{ rename_message }}</h2>
<hr />
<h2>{{ computed_double_counter }}</h2>
<h2>{{ toRefsMessage }}</h2>
<h2>{{ computed_print_message("呵呵呵") }}</h2>
</div>
</template>
<script>
import { mapGetters } from "vuex";
export default {
computed: {
...mapGetters(["doubleCounter"]),
...mapGetters({ rename_message: "message" }),
},
};
</script>
<script setup>
import { computed, toRefs } from "vue";
import { mapGetters, useStore } from "vuex";
const store = useStore();
const mapObject = mapGetters(["doubleCounter"]);
const computed_double_counter = computed(
mapObject.doubleCounter.bind({ $store: store })
);
// 直接对 store.getters 进行解构(推荐)
const { message: toRefsMessage } = toRefs(store.getters);
// 3.针对某一个getters属性使用computed
const computed_print_message = computed(() => store.getters.printMessage);
</script>
Mutation
更改 Vuex 的 store 中的状态的唯一方法是提交 mutation
1
2
3
4
5
6
7
8
9
10
11
12
13
14
15
16
17import { createStore } from "vuex";
const store = createStore({
state() {
return { counter: 100, message: "Hello,Vue" };
},
mutations: {
incrementCounter(state) {
state.counter++;
},
changeMessage(state, payload) {
state.message = payload;
},
},
});
export default store;1
2
3
4
5
6
7
8
9
10
11
12
13
14
15
16
17
18
19
20
21
22
23
24
25
26
27
28<template>
<div>
<h2>{{ $store.state.counter }}</h2>
<h2>{{ $store.state.message }}</h2>
<button @click="incrementCounter">incrementCounter</button>
<button @click="changeMessage">changeMessage</button>
</div>
</template>
<script>
export default {
methods: {
incrementCounter() {
this.$store.commit("incrementCounter");
},
},
};
</script>
<script setup>
import { useStore } from "vuex";
const store = useStore();
function changeMessage() {
store.commit("changeMessage", "Hello,JavaScript");
}
</script>
mapMutations
如果我们有很多个方法都需要获取的话,可以使用 mapMutations 的辅助函数
- mapMutations 的方式一:对象类型
- mapMutations 的方式一:数组类型
- 也可以使用展开运算符和原来有的 methods混合在一起
1
2
3
4
5
6
7
8
9
10
11
12
13
14
15
16
17
18
19
20
21
22
23
24
25
26
27
28
29
30
31
32<template>
<div>
<h2>{{ $store.state.counter }}</h2>
<h2>{{ $store.state.message }}</h2>
<button @click="increment1">increment1</button>
<button @click="increment2">increment2</button>
<button @click="changeMessage('嘻嘻嘻')">changeMessage</button>
</div>
</template>
<script>
import { mapMutations } from "vuex";
export default {
methods: {
...mapMutations(["changeMessage"]),
...mapMutations({
increment1: "incrementCounter",
}),
},
};
</script>
<script setup>
import { mapMutations, useStore } from "vuex";
const store = useStore();
const mapObject = mapMutations(["incrementCounter"]);
const increment2 = mapObject.incrementCounter.bind({ $store: store });
</script>
重要原则
- 一条重要的原则就是要记住 mutation 必须是同步函数
- 这是因为 devtool 工具会记录 mutation 的日记
- 每一条 mutation 被记录,devtools 都需要捕捉到前一状态和后一状态的快照
- 但是在 mutation 中执行异步操作,就无法追踪到数据的变化
- 所以 Vuex 的重要原则中要求 mutation 必须是同步函数
- 但是如果我们希望在 Vuex 中发送网络请求的话需要如何操作呢
Action
action 类似于 mutation 不同在于
- action 提交的是 mutation,而不是直接改变状态
- action 可以包含任意异步操作
这里有一个非常重要的参数 context
- context 是一个和 store 实例均有相同方法和属性的 context 对象
- 所以我们可以从其中获取到 commit 方法来提交一个 mutation,或者通过 context.state 和 context.getters 来获取 state 和 getters
1
2
3
4
5
6
7
8
9
10
11
12
13
14
15
16
17
18
19
20
21import { createStore } from "vuex";
const store = createStore({
state() {
return { counter: 100, message: "Hello,Vue" };
},
mutations: {
changeMessage(state, payload) {
state.message = payload;
},
},
actions: {
changeMessageAction(context, payload) {
setTimeout(() => {
context.commit("changeMessage", payload);
}, 300);
},
},
});
export default store;1
2
3
4
5
6
7
8
9
10
11
12
13
14
15
16
17
18
19
20
21
22
23
24
25
26
27<template>
<div>
<h2>{{ $store.state.message }}</h2>
<button @click="btnClick1">发起action修改message</button>
<button @click="btnClick2">发起action修改message</button>
</div>
</template>
<script>
export default {
methods: {
btnClick1() {
this.$store.dispatch("changeMessageAction", "btnClick1");
},
},
};
</script>
<script setup>
import { useStore } from "vuex";
const store = useStore();
function btnClick2() {
store.dispatch("changeMessageAction", "btnClick2");
}
</script>
mapActions
如果我们有很多个方法都需要获取的话,可以使用 mapActions 的辅助函数
- mapActions 的方式一:对象类型
- mapActions 的方式一:数组类型
- 也可以使用展开运算符和原来有的 methods混合在一起
1
2
3
4
5
6
7
8
9
10
11
12
13
14
15
16
17
18
19
20
21
22
23
24
25
26
27<template>
<div>
<h2>{{ $store.state.message }}</h2>
<button @click="btnClick1('btnClick1')">发起action修改message</button>
<button @click="btnClick2('btnClick2')">发起action修改message</button>
</div>
</template>
<script>
import { mapActions } from "vuex";
export default {
methods: {
...mapActions({ btnClick1: "changeMessageAction" }),
},
};
</script>
<script setup>
import { mapActions, useStore } from "vuex";
const store = useStore();
const mapObject = mapActions(["changeMessageAction"]);
const btnClick2 = mapObject.changeMessageAction.bind({ $store: store });
</script>
异步操作
action 通常是异步的,那么如何知道 action 什么时候结束呢?
- 我们可以通过让 action 返回 Promise,在 Promise 的 then 中来处理完成后的操作
1
2
3
4
5
6
7
8
9
10
11
12
13
14
15
16
17
18
19
20
21
22
23
24import { createStore } from "vuex";
const store = createStore({
state() {
return { counter: 100, message: "Hello,Vue" };
},
mutations: {
changeMessage(state, payload) {
state.message = payload;
},
},
actions: {
changeMessageAction(context, payload) {
return new Promise((resolve, reject) => {
setTimeout(() => {
context.commit("changeMessage", payload);
resolve("异步操作完成");
}, 300);
});
},
},
});
export default store;1
2
3
4
5
6
7
8
9
10
11
12
13
14
15
16
17
18
19
20
21
22
23
24
25
26
27
28
29
30
31
32
33<template>
<div>
<h2>{{ $store.state.message }}</h2>
<button @click="btnClick1">发起action修改message</button>
<button @click="btnClick2">发起action修改message</button>
</div>
</template>
<script>
export default {
methods: {
btnClick1() {
this.$store
.dispatch("changeMessageAction", "哈哈哈哈")
.then((res) => {
console.log(res + "1");
});
},
},
};
</script>
<script setup>
import { useStore } from "vuex";
const store = useStore();
function btnClick2() {
store.dispatch("changeMessageAction", "呵呵呵呵").then((res) => {
console.log(res + "2");
});
}
</script>
Module
什么是 Module
- 由于使用单一状态树,应用的所有状态会集中到一个比较大的对象,当应用变得非常复杂时,store 对象就有可能变得相当臃肿
- 为了解决以上问题,Vuex 允许我们将 store 分割成模块(module)
- 每个模块拥有自己的 state、mutation、action、getter 甚至是嵌套子模块
1
2
3
4
5
6
7
8
9
10
11import { createStore } from "vuex";
import Home from "./modules/home";
const store = createStore({
state() {
return { counter: 66, message: "Root Module" };
},
modules: { Home },
});
export default store;1
2
3
4
5
6
7
8
9
10
11
12
13
14
15
16
17
18
19
20
21const Home = {
state() {
return { counter: 99, message: "Home Module" };
},
mutations: {
incrementCounter(state, payload) {
state.counter += payload;
},
},
getters: {
calcCounter(state, getters, rootState, rootGetters) {
return state.counter + rootState.counter;
},
},
actions: {
incrementCounterAction(context, payload) {
context.commit("incrementCounter", payload);
},
},
};
export default Home;1
2
3
4
5
6
7
8
9
10
11
12
13
14
15
16
17
18
19
20
21
22
23
24
25
26
27
28
29
30
31
32
33
34
35
36<template>
<div>
<!-- 1.使用 state 时, 是需要 state.moduleName.xxx -->
<h2>{{ $store.state.Home.message }}</h2>
<!-- 2.使用 getters 时, 是直接 getters.xxx -->
<h2>{{ $store.getters.calcCounter }}</h2>
<button @click="incrementCounter">incrementCounter</button>
<button @click="incrementCounterAction">incrementCounterAction</button>
</div>
</template>
<script>
// mutations 和 actions, 默认也是不需要跟模块名称
export default {
created() {
console.log(this.$store.state);
},
methods: {
incrementCounter() {
this.$store.commit("incrementCounter", 1);
},
},
};
</script>
<script setup>
import { useStore } from "vuex";
const store = useStore();
console.log(store.state);
function incrementCounterAction() {
store.dispatch("incrementCounterAction", 2);
}
</script>
命名空间
默认情况下,模块内部的 action 和 mutation 仍然是注册在全局的命名空间中的
- 这样使得多个模块能够对同一个 action 或 mutation 作出响应
- getter 同样也默认注册在全局命名空间
如果我们希望模块具有更高的封装度和复用性,可以添加 namespaced: true 的方式使其成为带命名空间的模块
- 当模块被注册后,它的所有 getter、action 及 mutation 都会自动根据模块注册的路径调整命名
1
2
3
4
5
6
7
8
9
10
11
12
13
14
15
16
17
18
19
20
21
22
23
24
25
26const Home = {
namespaced: true,
state() {
return { counter: 99, message: "Home Module" };
},
mutations: {
// store.commit("Home/incrementCounter", 1)
incrementCounter(state, payload) {
state.counter += payload;
},
},
getters: {
// store.getters["Home/calcCounter"]
calcCounter(state, getters, rootState, rootGetters) {
return state.counter + rootState.counter;
},
},
actions: {
// store.dispatch("Home/incrementCounterAction", 2)
incrementCounterAction(context, payload) {
console.log(context); // commit dispatch getters rootGetters rootState state
context.commit("incrementCounter", payload);
},
},
};
export default Home;1
2
3
4
5
6
7
8
9
10
11
12
13
14
15
16
17
18
19
20
21
22
23
24
25
26
27
28
29
30
31
32
33<template>
<div>
<h2>{{ $store.state.Home.message }}</h2>
<h2>{{ $store.getters["Home/calcCounter"] }}</h2>
<button @click="incrementCounter">incrementCounter</button>
<button @click="incrementCounterAction">incrementCounterAction</button>
</div>
</template>
<script>
export default {
created() {
console.log(this.$store.state);
},
methods: {
incrementCounter() {
this.$store.commit("Home/incrementCounter", 1);
},
},
};
</script>
<script setup>
import { useStore } from "vuex";
const store = useStore();
console.log(store.state);
function incrementCounterAction() {
store.dispatch("Home/incrementCounterAction", 2);
}
</script>
修改或派发根组件
如果我们希望在 action 中修改 root 中的 state,那么有如下的方式
1
2context.commit("Root Mutations Name", "参数", { root: true });
context.dispatch("Root Actions Name", "参数", { root: true });
Pinia
Pinia(发音为/piːnjʌ/,如英语中的 “peenya” )是最接近 piña(西班牙语中的菠萝)的词
Pinia 开始于大概 2019 年,最初是作为一个实验为 Vue 重新设计状态管理,让它用起来像组合式 API(Composition API)
从那时到现在,最初的设计原则依然是相同的,并且目前同时兼容 Vue2、Vue3,也并不要求你使用 Composition API
Pinia 本质上依然是一个状态管理的库,用于跨组件、页面进行状态共享
Pinia 和 Vuex 的区别
那么我们不是已经有 Vuex 了吗?为什么还要用 Pinia 呢?
- Pinia 最初是为了探索 Vuex 的下一次迭代会是什么样子,结合了 Vuex 5 核心团队讨论中的许多想法
- 最终,团队意识到Pinia 已经实现了 Vuex5 中大部分内容,所以最终决定用 Pinia 来替代 Vuex
- 与 Vuex 相比,Pinia 提供了一个更简单的 API,具有更少的仪式,提供了 Composition-API 风格的 API
- 最重要的是,在与 TypeScript 一起使用时具有可靠的类型推断支持
和 Vuex 相比,Pinia 有很多的优势
- 比如 mutations 不再存在
- 他们经常被认为是 非常冗长
- 他们最初带来了 devtools 集成,但这不再是问题
- 更友好的 TypeScript 支持,Vuex 之前对 TS 的支持很不友好
- 不再有 modules 的嵌套结构
- 你可以灵活使用每一个 store,它们是通过扁平化的方式来相互使用的
- 也不再有命名空间的概念,不需要记住它们的复杂关系
- 比如 mutations 不再存在
安装与使用
使用 pinia 之前,我们需要先对其进行安装
1
npm install pinia
创建一个 pinia 并且将其传递给应用程序
1
2
3
4
5
6// src/stores/index.js
import { createPinia } from "pinia";
const pinia = createPinia();
export default pinia;1
2
3
4
5import { createApp } from "vue";
import App from "./App.vue";
import pinia from "./stores";
createApp(App).use(pinia).mount("#app");
Store
什么是 Store?
- 一个 Store (如 Pinia)是一个实体,它会持有为绑定到你组件树的状态和业务逻辑,也就是保存了全局的状态
- 它有点像始终存在,并且每个人都可以读取和写入的组件
- 你可以在你的应用程序中定义任意数量的 Store 来管理你的状态
Store 有三个核心概念
- state、getters、actions
- 等同于组件的 data、computed、methods
- 一旦 store 被实例化,你就可以直接在 store 上访问 state、getters 和 actions 中定义的任何属性
定义 Store
我们需要知道 Store 是使用 defineStore() 定义的
并且它需要一个唯一名称,作为第一个参数传递
1
2
3
4
5
6
7
8
9
10// src/stores/home.js
import { defineStore } from "pinia";
const useHome = defineStore("home", {
state() {
return { message: "哈哈哈", counter: 66 };
},
});
export default useHome;这个 name 也称为 id,是必要的,Pinia 使用它来将 store 连接到 devtools
返回的函数统一使用 useX 作为命名方案,这是约定的规范
使用 Store
Store 在它被使用之前是不会创建的,我们可以通过调用use 函数来使用 Store
1
2
3
4
5
6
7
8
9
10
11<template>
<div>
<h2>{{ homeStore.message }}</h2>
</div>
</template>
<script setup>
import useHome from "./stores/home";
const homeStore = useHome();
</script>注意 Store 获取到后不能被解构,那么会失去响应式
- 为了从 Store 中提取属性同时保持其响应式,您需要使用storeToRefs()
1
2
3
4
5
6
7
8
9
10
11
12
13
14
15
16
17
18
19
20
21
22
23<template>
<div>
<h2>{{ homeStore.message }}</h2>
<h2>homeStore.counter: {{ homeStore.counter }}</h2>
<h2>counter: {{ counter }}</h2>
<button @click="increment">+1</button>
</div>
</template>
<script setup>
import { toRefs } from "vue";
import { storeToRefs } from "pinia";
import useHome from "./stores/home";
const homeStore = useHome();
// const { counter } = homeStore; // 不是响应式的
// const { counter } = toRefs(homeStore);
const { counter } = storeToRefs(homeStore);
function increment() {
homeStore.counter++;
}
</script>
操作状态
读取和写入 state
- 默认情况下,您可以通过 store 实例访问状态来直接读取和写入状态
1
2
3
4
5
6
7
8
9
10
11
12
13
14
15
16
17<template>
<div>
<h2>{{ homeStore.message }} - {{ homeStore.counter }}</h2>
<button @click="increment">+1</button>
</div>
</template>
<script setup>
import useHome from "./stores/home";
const homeStore = useHome();
function increment() {
homeStore.message = "呵呵呵";
homeStore.counter++;
}
</script>重置 State
- 可以通过调用 store 上的 $reset() 方法将状态 重置 到其初始值
1
2
3
4
5
6
7
8
9
10
11
12
13
14
15
16
17
18
19
20
21<template>
<div>
<h2>{{ homeStore.message }} - {{ homeStore.counter }}</h2>
<button @click="increment">+1</button>
<button @click="reset">reset</button>
</div>
</template>
<script setup>
import useHome from "./stores/home";
const homeStore = useHome();
function increment() {
homeStore.message = "呵呵呵";
homeStore.counter++;
}
function reset() {
homeStore.$reset();
}
</script>改变 State
- 除了直接用 store.counter++ 修改 store,你还可以调用 $patch 方法
- 它允许您使用部分 state 对象同时应用多个更改
1
2
3
4
5
6
7
8
9
10
11
12
13
14
15
16
17
18
19
20<template>
<div>
<h2>{{ homeStore.message }} - {{ homeStore.counter }}</h2>
<button @click="patch">patch</button>
<button @click="reset">reset</button>
</div>
</template>
<script setup>
import useHome from "./stores/home";
const homeStore = useHome();
function patch() {
homeStore.$patch({ message: "哈嘿嘻", counter: 99 });
}
function reset() {
homeStore.$reset();
}
</script>
Getters
Getters 相当于 Store 的计算属性
- 它们可以用 defineStore() 中的 getters 属性定义
- getters 中可以定义接受一个 state 作为参数的函数
1
2
3
4
5
6
7
8
9
10
11
12
13
14
15
16
17
18
19
20
21
22
23
24
25
26
27// src/stores/home.js
import { defineStore } from "pinia";
const useHome = defineStore("home", {
state() {
return { message: "哈哈哈", counter: 66 };
},
getters: {
// 基本使用
doubleCounter(state) {
return state.counter * 2;
},
// 在该getters属性中, 获取其他的getters
doubleCounterAddOne() {
// this 是 store 实例
return this.doubleCounter + 1;
},
// getters是可以返回一个函数的, 调用这个函数可以传入参数
printMessage() {
return function (message) {
return `${message}`;
};
},
},
});
export default useHome;
访问 Getters
访问当前 store 的 Getters
1
2
3
4
5
6
7
8<script setup>
import useHome from "./stores/home";
const homeStore = useHome();
console.log(homeStore.doubleCounter);
console.log(homeStore.doubleCounterAddOne);
console.log(homeStore.printMessage("嘻嘻嘻"));
</script>Getters 中访问自己的其他 Getters
- 可以通过this 来访问到当前 store 实例的所有其他属性
1
2
3
4
5getters: {
doubleCounterAddOne() {
return this.doubleCounter + 1;
},
},访问其他 store 的 Getters
1
2
3
4
5
6
7
8import useUser from './user'
getters: {
showMessage(state) {
const userStore = useUser()
return `name:${userStore.name} - message:${state.message}`
},
},
Actions
Actions 相当于组件中的 methods
- 可以使用 defineStore() 中的 actions 属性定义,并且它们非常适合定义业务逻辑
和 getters 一样,在 action 中可以通过this 访问整个 store 实例的所有操作
1
2
3
4
5
6
7
8
9
10
11
12
13
14
15
16
17
18// src/stores/home.js
import { defineStore } from "pinia";
const useHome = defineStore("home", {
state() {
return { message: "哈哈哈", counter: 66 };
},
actions: {
increment() {
this.counter++;
},
incrementNum(num) {
this.counter += num;
},
},
});
export default useHome;1
2
3
4
5
6
7
8
9
10
11
12
13
14
15
16
17
18
19
20<template>
<div>
<h2>{{ homeStore.counter }}</h2>
<button @click="increment">increment</button>
<button @click="incrementNum">incrementNum</button>
</div>
</template>
<script setup>
import useHome from "./stores/home";
const homeStore = useHome();
function increment() {
homeStore.increment();
}
function incrementNum() {
homeStore.incrementNum(10);
}
</script>
高级特性
自定义指令
在 Vue 的模板语法中我们学习过各种各样的指令:v-show、v-for、v-model 等等,除了使用这些指令之外,Vue 也允许我们来自定义自己的指令
- 注意:在 Vue 中,代码的复用和抽取主要还是通过组件
- 通常在某些情况下,你需要对DOM 元素进行底层操作,这个时候就会用到自定义指令
自定义指令分为两种:
- 自定义局部指令:组件中通过 directives 选项,只能在当前组件中使用
- 自定义全局指令:app 的 directive 方法,可以在任意组件中被使用
1
2
3
4
5
6
7
8
9
10
11
12
13
14
15
16
17
18
19
20
21
22
23
24
25
26
27
28<template>
<div>
<h2 v-insertText1></h2>
<h2 v-insertText2></h2>
<h2 v-insertText3></h2>
</div>
</template>
<script>
export default {
directives: {
insertText1: {
mounted(el) {
el.textContent = "哈哈哈哈";
},
},
},
};
</script>
<script setup>
// v后面的一个字母需要大写 (vinsertText2) 会报错
const vInsertText2 = {
mounted(el) {
el.textContent = "呵呵呵呵";
},
};
</script>1
2
3
4
5
6
7
8
9
10
11
12import { createApp } from "vue";
import App from "./App.vue";
const app = createApp(App);
app.directive("insertText3", {
mounted(el) {
el.textContent = "嘿嘿嘿嘿";
},
});
app.mount("#app");
生命周期
一个指令定义的对象,Vue 提供了如下的几个钩子函数
- created:在绑定元素的 attribute 或事件监听器被应用之前调用
- beforeMount:当指令第一次绑定到元素并且在挂载父组件之前调用
- mounted:在绑定元素的父组件被挂载后调用
- beforeUpdate:在更新包含组件的 VNode 之前调用
- updated:在包含组件的 VNode 及其子组件的 VNode 更新后调用
- beforeUnmount:在卸载绑定元素的父组件之前调用
- unmounted:当指令与元素解除绑定且父组件已卸载时,只调用一次
1
2
3
4
5
6
7
8
9
10
11
12
13
14
15
16
17
18
19
20
21
22
23
24
25
26
27
28
29
30
31
32
33
34
35
36
37
38
39<template>
<div>
<button @click="counter++">+1</button>
<button @click="isShowContent = !isShowContent">isShowContent</button>
<h2 v-if="isShowContent" v-process>{{ counter }}</h2>
</div>
</template>
<script setup>
import { ref } from "vue";
const counter = ref(0);
const isShowContent = ref(true);
const vProcess = {
created() {
console.log("created");
},
beforeMount() {
console.log("beforeMount");
},
mounted() {
console.log("mounted");
},
beforeUpdate() {
console.log("beforeUpdate");
},
updated() {
console.log("updated");
},
beforeUnmount() {
console.log("beforeUnmount");
},
unmounted() {
console.log("unmounted");
},
};
</script>
参数和修饰符
如果我们指令需要接受一些参数或者修饰符应该如何操作呢
- info 是参数的名称
- aaa.bbb 是修饰符的名称
- 后面是传入的具体的值
在我们的生命周期中,我们可以通过 bindings 获取到对应的内容
1
2
3
4
5
6
7
8
9
10
11
12
13
14
15
16
17
18<template>
<div>
<h2 v-unit:info.aaa.bbb="'¥'">1000</h2>
<h2 v-unit="'$'">2000</h2>
</div>
</template>
<script setup>
const vUnit = {
mounted(el, bindings) {
console.log(bindings);
const defaultText = el.textContent;
const unit = bindings.value;
el.textContent = unit + defaultText;
},
};
</script>
Teleport
在组件化开发中,我们封装一个组件 A,在另外一个组件 B 中使用
- 那么组件 A 中 template 的元素,会被挂载到组件 B 中 template的某个位置
- 最终我们的应用程序会形成一颗 DOM 树结构
但是某些情况下,我们希望组件不是挂载在这个组件树上的,可能是移动到 Vue app 之外的其他位置
- 比如移动到 body 元素上,或者我们有其他的 div#app 之外的元素上
- 这个时候我们就可以通过 teleport 来完成
Teleport 是什么呢?
- 它是一个Vue 提供的内置组件,类似于 react 的 Portals
- teleport 翻译过来是心灵传输、远距离运输的意思
- 它有两个属性
- to:指定将其中的内容移动到的目标元素,可以使用选择器
- disabled:是否禁用 teleport 的功能
- 它有两个属性
1
2
3
4
5
6
7
8
9
10
11
12
13
14
15
16
17
18
19
20
21<template>
<div>
<teleport to="body">
<h2>哈哈哈哈</h2>
</teleport>
<teleport to="#other">
<h2>呵呵呵呵</h2>
</teleport>
<teleport to="#other">
<h2>嘻嘻嘻嘻</h2>
</teleport>
</div>
</template>
<!--index.html-->
<body>
<div id="app"></div>
<div id="other"></div>
</body>
Suspense
注意:目前(2021-08-09)Suspense 显示的是一个实验性的特性,API 随时可能会修改
Suspense 是一个内置的全局组件,该组件有两个插槽
- default:如果 default 可以显示,那么显示 default 的内容
- fallback:如果 default 无法显示,那么会显示 fallback 插槽的内容
1
2
3
4
5
6
7
8
9
10
11
12
13
14
15
16
17
18
19<template>
<div class="app">
<suspense>
<template #default>
<async-home />
</template>
<template #fallback>
<h1>加载中...</h1>
</template>
</suspense>
</div>
</template>
<script setup>
import { defineAsyncComponent } from "vue";
const AsyncHome = defineAsyncComponent(() => import("./AsyncHome.vue"));
</script>1
2
3
4
5<template>
<div class="async-home">
<h2>AsyncHome</h2>
</div>
</template>
认识 Vue 插件
通常我们向 Vue 全局添加一些功能时,会采用插件的模式,它有两种编写方式
- 对象类型:一个对象,但是必须包含一个 install 的函数,该函数会在安装插件时执行
- 函数类型:一个 function,这个函数会在安装插件时自动执行
插件可以完成的功能没有限制,比如下面的几种都是可以的
- 添加全局方法或者 property,通过把它们添加到 config.globalProperties 上实现
- 添加全局资源:指令/过滤器/过渡等
- 通过全局 mixin 来添加一些组件选项
- 一个库,提供自己的 API,同时提供上面提到的一个或多个功能
1
2
3
4
5
6
7
8
9
10
11
12
13
14
15
16
17
18import { createApp } from "vue";
import App from "./App.vue";
const app = createApp(App);
// 方式一: 传入对象的情况
app.use({
install: function (app) {
console.log("传入对象的install被执行:", app);
},
});
// 方式二: 传入函数的情况
app.use(function (app) {
console.log("传入函数被执行:", app);
});
app.mount("#app");
认识 h 函数
Vue 推荐在绝大数情况下使用模板来创建你的 HTML,然后一些特殊的场景,你真的需要JavaScript 的完全编程的能力,这个时候你可以使用 渲染函数 ,它比模板更接近编译器
前面我们讲解过VNode 和 VDOM的概念
- Vue 在生成真实的 DOM 之前,会将我们的节点转换成 VNode,而 VNode 组合在一起形成一颗树结构,就是虚拟 DOM(VDOM)
- 事实上,我们之前编写的 template 中的 HTML 最终也是使用渲染函数生成对应的 VNode
- 那么,如果你想充分的利用 JavaScript 的编程能力,我们可以自己来编写 createVNode 函数,生成对应的 VNode
那么我们应该怎么来做呢?使用 h()函数
- h() 函数是一个用于创建 vnode 的一个函数
- 其实更准确的命名是 createVNode() 函数,但是为了简便在 Vue 将之简化为 h() 函数
使用方式
h()函数 如何使用呢?它接受三个参数
1
2// {String | Object | Function} tag
// 一个 HTML 标签名、一个组件、一个异步组件 或 一个函数式组件。必须的1
2// {Object} props
// 与 attribute、prop 和事件相对应的对象。这会在模板中用到。可选的1
2// {String | Array | Object} children
// 子 VNodes, 使用 h() 构建,或使用字符串获取 "文本 VNode" 或者,有插槽的对象。可选的注意事项
- 如果没有props,那么通常可以将 children 作为第二个参数传入
- 如果会产生歧义,可以将 null 作为第二个参数传入,将children 作为第三个参数传入
1
2
3
4
5
6
7
8
9
10
11
12
13
14
15
16
17
18
19
20
21
22
23
24
25
26
27
28
29<!-- Vue2 -->
<script>
import { h } from "vue";
import Home from "./Home.vue";
export default {
data() {
return { counter: 0 };
},
render() {
return h("div", { className: "app" }, [
h("h2", null, `当前计数: ${this.counter}`),
h("button", { onClick: this.increment }, "+1"),
h("button", { onClick: this.decrement }, "-1"),
h(Home),
]);
},
methods: {
increment() {
this.counter++;
},
decrement() {
this.counter--;
},
},
};
</script>1
2
3
4
5
6
7
8
9
10
11
12
13
14
15
16
17
18
19
20
21
22
23
24
25
26
27
28
29
30
31
32
33
34
35
36
37
38
39
40
41
42
43
44
45
46
47
48
49
50
51<!--
<script>
import { h, ref } from "vue";
import Home from "./Home.vue";
export default {
setup() {
const counter = ref(0);
const increment = () => {
counter.value++;
};
const decrement = () => {
counter.value--;
};
return () =>
h("div", { className: "app" }, [
h("h2", null, `当前计数: ${counter.value}`),
h("button", { onClick: increment }, "+1"),
h("button", { onClick: decrement }, "-1"),
h(Home),
]);
},
};
</script>
-->
<template>
<render />
</template>
<script setup>
import { ref, h } from "vue";
import Home from "./Home.vue";
const counter = ref(0);
const increment = () => {
counter.value++;
};
const decrement = () => {
counter.value--;
};
const render = () =>
h("div", { className: "app" }, [
h("h2", null, `当前计数: ${counter.value}`),
h("button", { onClick: increment }, "+1"),
h("button", { onClick: decrement }, "-1"),
h(Home),
]);
</script>1
2
3
4
5<template>
<div>
<h2>Home Page</h2>
</div>
</template>
jsx
如果我们希望在项目中使用 jsx,那么我们需要添加对 jsx 的支持
- jsx 我们通常会通过 Babel 来进行转换
- 对于 Vue 来说,我们只需要在Babel 中配置对应的插件即可
Webpack
- npm install @vue/babel-plugin-jsx -D
1
2
3
4
5// babel.config.js
module.exports = {
presets: ["@vue/cli-plugin-babel/preset"],
plugins: ["@vue/babel-preset-jsx"],
};Vite
- npm install @vitejs/plugin-vue-jsx -D
1
2
3
4
5// vite.config.js
import jsx from "@vitejs/plugin-vue-jsx";
export default defineConfig({
plugins: [jsx()],
});1
2
3
4
5
6
7
8
9
10
11
12
13<!-- Vue2 -->
<script lang="jsx">
export default {
render() {
return (
<div class="app">
<h2>我是标题</h2>
<p>我是内容, 哈哈哈</p>
</div>
);
},
};
</script>1
2
3
4
5
6
7
8
9
10
11
12
13
14
15
16
17
18
19
20
21
22
23
24
25
26
27
28
29
30
31
32
33
34
35
36
37
38
39
40
41
42
43
44
45
46
47
48
49
50
51
52
53<!--
<script lang="jsx">
import { ref } from "vue";
import Home from "./Home.vue";
export default {
setup() {
const counter = ref(0);
const increment = () => {
counter.value++;
};
const decrement = () => {
counter.value--;
};
return () => (
<div class="app">
<h2>当前计数: {counter.value}</h2>
<button onClick={increment}>+1</button>
<button onClick={decrement}>-1</button>
<Home />
</div>
);
},
};
</script>
-->
<template>
<jsx />
</template>
<script lang="jsx" setup>
import { ref } from "vue";
import Home from "./Home.vue";
const counter = ref(0);
const increment = () => {
counter.value++;
};
const decrement = () => {
counter.value--;
};
const jsx = () => (
<div class="app">
<h2>当前计数: {counter.value}</h2>
<button onClick={increment}>+1</button>
<button onClick={decrement}>-1</button>
<Home />
</div>
);
</script>
认识动画
在开发中,我们想要给一个元素或者组件的显示和消失添加某种过渡动画,可以很好的增加用户体验
- React 框架本身并没有提供任何动画相关的 API,所以在 React 中使用过渡动画我们需要使用一个第三方库 react-transitiongroup
- Vue 中为我们提供一些内置组件和对应的 API来完成动画,利用它们我们可以方便的实现过渡动画效果
我们来看一个案例
- Hello World 的显示和隐藏
- 通过下面的代码实现,是不会有任何动画效果的
1
2
3
4
5
6
7
8
9
10
11
12<template>
<div>
<button @click="isShow = !isShow">切换</button>
<h2 v-if="isShow">Hello World</h2>
</div>
</template>
<script setup>
import { ref } from "vue";
const isShow = ref(true);
</script>没有动画的情况下,整个内容的显示和隐藏会非常的生硬
- 如果我们希望给单元素或者组件实现过渡动画,可以使用 transition 内置组件来完成动画
transition 动画
Vue 提供了 transition 的封装组件,在下列情形中,可以给任何元素和组件添加进入/离开过渡
- 条件渲染
- 动态组件
- 组件根节点
1
2
3
4
5
6
7
8
9
10
11
12
13
14
15
16
17
18
19
20
21
22
23
24
25
26
27
28
29
30
31
32
33<template>
<div>
<button @click="isShow = !isShow">切换</button>
<transition>
<h2 v-if="isShow">Hello World</h2>
</transition>
</div>
</template>
<script setup>
import { ref } from "vue";
const isShow = ref(true);
</script>
<style scoped>
.v-enter-from,
.v-leave-to {
opacity: 0;
transform: scale(0.6);
}
.v-enter-to,
.v-leave-from {
opacity: 1;
transform: scale(1);
}
.v-enter-active,
.v-leave-active {
transition: all 0.5s ease;
}
</style>
组件的原理
- 我们会发现,Vue 自动给 h2 元素添加了动画,这是什么原因呢
- 当插入或删除包含在 transition 组件中的元素时,Vue 将会做以下处理
- 自动检查目标元素是否应用了 CSS 过渡或者动画,如果有,那么在恰当的时机添加/删除 CSS 类名
- 如果 transition 组件提供了JavaScript 钩子函数,这些钩子函数将在恰当的时机被调用
- 如果没有找到 JavaScript 钩子并且也没有检测到 CSS 过渡/动画,DOM 插入、删除操作将会立即执行
- 那么都会添加或者删除哪些 class 呢
过渡动画类名
- 我们会发现上面提到了很多个 class,事实上 Vue 就是帮助我们在这些 class 之间来回切换完成的动画
- v-enter-from:定义进入过渡的开始状态
- 在元素被插入之前生效,在元素被插入之后的下一帧移除
- v-enter-active:定义进入过渡生效时的状态
- 在整个进入过渡的阶段中应用,在元素被插入之前生效,在过渡/动画完成之后移除。这个类可以被用来定义进入过渡的过程时间,延迟和曲线函数
- v-enter-to:定义进入过渡的结束状态
- 在元素被插入之后下一帧生效 (与此同时 v-enter-from 被移除),在过渡/动画完成之后移除
- v-leave-from:定义离开过渡的开始状态
- 在离开过渡被触发时立刻生效,下一帧被移除
- v-leave-active:定义离开过渡生效时的状态
- 在整个离开过渡的阶段中应用,在离开过渡被触发时立刻生效,在过渡/动画完成之后移除。这个类可以被用来定义离开过渡的过程时间,延迟和曲线函数
- v-leave-to:离开过渡的结束状态
- 在离开过渡被触发之后下一帧生效 (与此同时 v-leave-from 被删除),在过渡/动画完成之后移除
- v-enter-from:定义进入过渡的开始状态
添加的时机和命名规则
![]()
- class 的 name 命名规则如下
- 如果我们使用的是一个没有 name 的 transition,那么所有的 class 是以 v- 作为默认前缀
- 如果我们添加了一个 name 属性,比如
<transtion name="shy">,那么所有的 class 会以 shy- 开头
过渡 css 动画
前面我们是通过 transition 来实现的动画效果,另外我们也可以通过 animation 来实现
1
2
3
4
5
6
7
8
9
10
11
12
13
14
15
16
17
18
19
20
21
22
23
24
25
26
27
28
29
30
31
32
33
34
35
36
37
38
39
40
41
42
43
44
45<template>
<div>
<div>
<button @click="isShow = !isShow">切换</button>
</div>
<transition name="shy">
<h2 v-if="isShow">
要是有些事我没说,地坛,你别以为是我忘了,我什么也没忘,但是有些事只适合收藏。不能说,也不能想,却又不能忘。它们不能变成语言,它们无法变成语言,一旦变成语言就不再是它们了。它们是一片朦胧的温馨与寂寥,是一片成熟的希望与绝望,它们的领地只有两处:心与坟墓。比如说邮票,有些是用于寄信的,有些仅仅是为了收藏。
</h2>
</transition>
</div>
</template>
<script setup>
import { ref } from "vue";
const isShow = ref(true);
</script>
<style scoped>
.shy-enter-active {
animation: animation 1s ease;
}
.shy-leave-active {
animation: animation 1s ease reverse;
}
@keyframes animation {
0% {
transform: scale(0);
opacity: 0;
}
50% {
transform: scale(1.2);
opacity: 0.5;
}
100% {
transform: scale(1);
opacity: 1;
}
}
</style>
同时设置过渡和动画
Vue 为了知道过渡的完成,内部是在监听 transitionend 或 animationend,到底使用哪一个取决于元素应用的 CSS 规则
- 如果我们只是使用了其中的一个,那么Vue 能自动识别类型并设置监听
但是如果我们同时使用了过渡和动画呢
- 并且在这个情况下可能某一个动画执行结束时,另外一个动画还没有结束
- 在这种情况下,我们可以设置 type 属性为 animation 或者 transition 来明确的告知 Vue 监听的类型
1
2
3<transition name="shy" type="transition">
<h2 v-if="isShow">哈哈哈哈</h2>
</transition>
指定动画时间
我们也可以显示的来指定过渡的时间,通过 duration 属性
duration 可以设置两种类型的值
- number 类型:同时设置进入和离开的过渡时间
- object 类型:分别设置进入和离开的过渡时间
1
2
3
4
5
6
7<transition name="shy" :duration="1000">
<h2 v-if="isShow">哈哈哈哈</h2>
</transition>
<transition name="shy" :duration="{ enter: 500, leave: 1000 }">
<h2 v-if="isShow">哈哈哈哈</h2>
</transition>
过渡的模式
我们来看当前的动画在两个元素之间切换的时候存在的问题
我们会发现 哈哈哈 和 呵呵呵 是同时存在的
- 这是因为默认情况下进入和离开动画是同时发生的
- 如果确实我们希望达到这个的效果,那么是没有问题
但是如果我们不希望同时执行进入和离开动画,那么我们需要设置 transition 的过渡模式
- in-out:新元素先进行过渡,完成之后当前元素过渡离开
- out-in:当前元素先进行过渡,完成之后新元素过渡进入
1
2
3
4
5
6
7
8
9
10
11
12
13
14
15
16
17
18
19
20
21
22
23
24
25
26
27
28
29
30
31
32
33
34
35
36
37
38
39
40
41
42
43
44
45
46
47
48
49
50
51<template>
<div>
<button @click="isShow = !isShow">切换</button>
<transition name="shy" mode="out-in">
<h2 v-if="isShow">哈哈哈</h2>
<h2 v-else>呵呵呵</h2>
</transition>
</div>
</template>
<script setup>
import { ref } from "vue";
const isShow = ref(true);
</script>
<style scoped>
.shy-enter-from,
.shy-leave-to {
opacity: 0;
}
.shy-enter-to,
.shy-leave-from {
opacity: 1;
}
.shy-enter-active {
animation: shyAnim 0.5s ease;
transition: opacity 0.5s ease;
}
.shy-leave-active {
animation: shyAnim 0.5s ease reverse;
transition: opacity 0.5s ease;
}
@keyframes shyAnim {
0% {
transform: scale(0);
}
50% {
transform: scale(1.2);
}
100% {
transform: scale(1);
}
}
</style>
初次渲染
默认情况下,首次渲染的时候是没有动画的,如果我们希望给他添加上去动画,那么就可以增加另外一个属性 appear
1
2
3<transition appear>
<h2 v-if="isShow">哈哈哈哈</h2>
</transition>
认识列表的过渡
目前为止,过渡动画我们只要是针对单个元素或者组件的
- 要么是单个节点
- 要么是同一时间渲染多个节点中的一个
那么如果希望渲染的是一个列表,并且该列表中添加删除数据也希望有动画执行呢
- 这个时候我们要使用
<transition-group>组件来完成
- 这个时候我们要使用
使用 transition-group 有如下的特点
- 默认情况下,它不会渲染一个元素的包裹器,但是你可以指定一个元素并以 tag attribute 进行渲染
- 过渡模式不可用,因为我们不再相互切换特有的元素
- 内部元素总是需要提供唯一的 key attribute 值
- CSS 过渡的类将会应用在内部的元素中,而不是这个组/容器本身
1
2
3
4
5
6
7
8
9
10
11
12
13
14
15
16
17
18
19
20
21
22
23
24
25
26
27
28
29
30
31
32
33
34
35
36
37
38
39
40
41
42
43
44
45
46
47
48
49
50
51
52
53
54
55
56
57
58
59
60
61
62
63
64
65
66
67
68
69<template>
<div>
<button @click="addNumber">添加数字</button>
<button @click="removeNumber">删除数字</button>
<button @click="shuffleNumber">打乱数字</button>
<transition-group tag="div" name="shy">
<template v-for="item in nums" :key="item">
<span>{{ item }}</span>
</template>
</transition-group>
</div>
</template>
<script setup>
import { ref } from "vue";
import { shuffle } from "underscore";
const nums = ref([0, 1, 2, 3, 4, 5, 6, 7, 8, 9]);
const addNumber = () => {
nums.value.splice(randomIndex(), 0, nums.value.length);
};
const removeNumber = () => {
nums.value.splice(randomIndex(), 1);
};
const shuffleNumber = () => {
nums.value = shuffle(nums.value);
};
const randomIndex = () => {
return Math.floor(Math.random() * nums.value.length);
};
</script>
<style scoped>
span {
margin-right: 10px;
display: inline-block;
}
.shy-enter-from,
.shy-leave-to {
opacity: 0;
transform: translateY(30px);
}
.shy-enter-to,
.shy-leave-from {
opacity: 1;
transform: translateY(0);
}
.shy-enter-active,
.shy-leave-active {
transition: all 0.5s ease;
}
.shy-leave-active {
position: absolute;
}
/* 针对其他移动的阶段需要的动画 */
.shy-move {
transition: all 0.5s ease;
}
</style>在上面的案例中虽然新增的或者删除的节点是有动画的,但是对于哪些其他需要移动的节点是没有动画的
- 我们可以通过使用一个新增的 v-move 的 class来完成动画
- 它会在元素改变位置的过程中应用
- 像之前的名字一样,我们可以通过 name 来自定义前缀